
The heart rate (HR) drift test is an important tool for athletes aiming to gauge their cardiovascular and metabolic fitness. This article will guide you through performing and interpreting this test. If you’d like, jump directly to the instructions.
A short history of heart rate drift
Back in the day, coaches and endurance athletes noticed that during prolonged training, an athlete’s heart rate would slowly climb while the athlete maintained a steady pace. Bear in mind that this was long before modern GPS watches, so much of this “noticing” was very subjective. Nonetheless, to these early observers the anecdotal evidence suggested that the faster the pace, the more the athlete’s heart rate would drift upward during the second half of the workout—a phenomenon that became known as heart rate drift. TrainingPeaks refers to this as decoupling.
from linear to nonlinear
What these athletes and coaches were observing was the linear relationship between heart rate and pace in the aerobic metabolic domain. In other words, when you are operating in Zones 1 and 2 (intensities at which your aerobic metabolism is providing the bulk of the energy needed), your heart rate increases in lockstep with your pace if your movement economy is uniform throughout these lower speeds. For instance, an increase of 0.5 kilometer/hour in speed will result in the same jump in heart rate whether the speed increase is from 6 to 6.5 kilometers/hour or from 9.5 to 10 kilometers/hour, as long as these speeds are within your aerobic domain.
Once your speed or intensity exceeds your aerobic threshold (AeT), this linear relationship breaks down—decouples—and becomes nonlinear. Each small increase in speed will cause a smaller and smaller increase in heart rate. Above your anaerobic threshold (AnT) it becomes highly nonlinear, eventually plateauing at your maximum heart rate.
With modern GPS watches and heart rate monitors and the precision of data collection they allow, it is easy to see this decoupling between heart rate and pace. We at Uphill Athlete have extolled the virtues of the data crunching that TrainingPeaks offers, and decoupling (heart rate drift) is another helpful, functional metric that you can use to monitor your fitness progress as you accumulate training hours.
WHAT IS THE HEART RATE DRIFT TEST?
A heart rate drift test, also known as an aerobic drift test, is a practical assessment that can be used to evaluate an athlete’s aerobic efficiency at any point in time. It can be repeated to track your progress over time. The test itself involves maintaining a steady effort or pace while recording your heart rate over a 60-minute time period. The test comes by observing how much the heart rate increases during the second half of the test, assuming constant speed and conditions. This increase is expressed as a percentage and is what we use to set the top of your Zone 2 for your heart rate training zones.
Am I fit enough?
To complete this test, you need to be able to run or hike at a consistent effort for 60 minutes (after a 10-15 minute warm up). If you are not there just yet, not to worry! Continue to focus on building up your endurance to where you can walk, run, or hike at a conversational pace for 60 minutes before attempting the test.
Should I run or should I hike?
If you are going to be doing a lot of running in your training, do this test as a run. If you are primarily going to be hiking for your training, do this test as a hike on a treadmill or stair machine.
What should the effort feel like?
This effort should feel easy and relaxed—a conversational pace. In other words, you should be able to carry on a conversation in full sentences.
Will my AeT change?
Your AeT is not fixed. It changes by small increments from day to day based on your recovery state and overall fitness. On the scale of months and years, it changes dramatically when you follow proper endurance training protocols. It typically takes 4-6 weeks to see your aerobic fitness significantly improve.
Why do the heart rate drift test?
The heart rate drift test is based on a decoupling metric and is a convenient means of measuring your fitness at any given point in time. It helps you to ensure that your workouts are within your aerobic capacity, and it can be used as an occasional spot check that your zones are set correctly as your fitness improves.
WHAT YOU'LL NEED
- Chest-strap or arm-band heart rate monitor
A chest strap heart-rate monitor will be needed to collect accurate data. Arm-band monitors are also good and many female athletes prefer these. Wrist-based heart rate monitors are not (yet) accurate enough for these tests.
Pro tip: Using a bit of water or saliva and wet the contacts of your chest strap or arm-band heart rate monitor to ensure that the device has good contact and reads the electrical impulses of your heart accurately. - GPS watch or smartphone
Most people use a GPS-enabled training watch from Garmin, COROS, or Sunnto. You need a watch that records BOTH GPS and heart-rate data from the monitor. It is also possible (and cheaper) to use your existing smartphone with an app such as the Wahoo Tickr, which connects the Wahoo Tickr heart rate monitor to your phone for recording. - Treadmill or flat running track
The heart rate drift test can be conducted indoors on a treadmill or outdoors on a flat course such as a running track. The purpose of the treadmill or track is to ensure consistency of effort for one hour. If you’re a mountaineer or ski athlete, then treadmills are the best option for performing. If you’re a runner, use the track. Trails have too many pitch changes and your heart rate will change every time the trail flattens out or gets steep. It’s crucial to keep the conditions (exertion level, pace, incline) unchanged throughout the test.
Perhaps the biggest difference between outdoor and indoor testing will be how your data set looks (below).
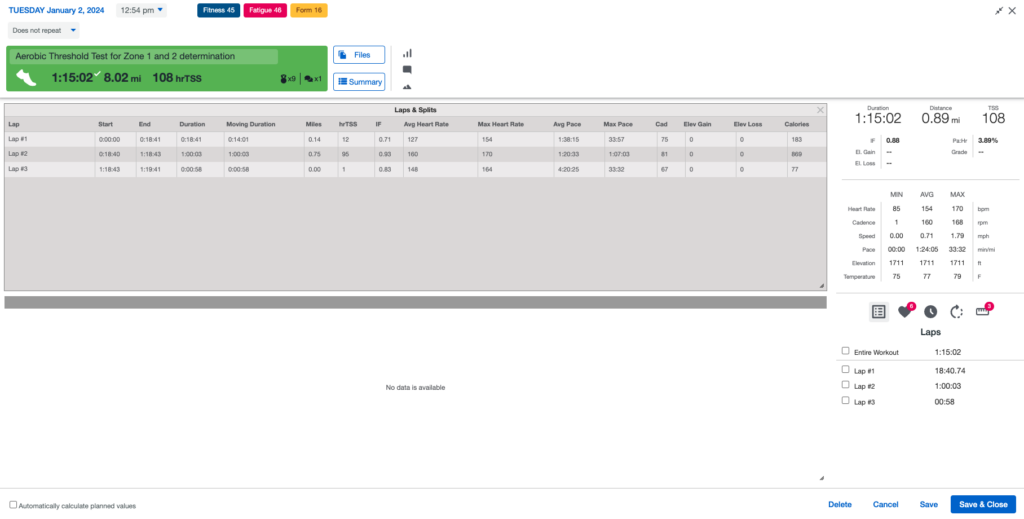
Indoor data set
Outdoor data set
(includes map and elevation)

- TrainingPeaks Premium. A TrainingPeaks Premium account is required; it does the math and analyzes the data for you. If you’ve never had a TrainingPeaks account, open an account and you’ll have a free Premium account for two weeks. Alternatively, you can do a phone consultation with a coach and we can analyze the data for you. If it’s your first time using Training Peaks, you’ll need to sync up your smartwatch and HR monitor.
SIMPLIFIED INSTRUCTIONS
The following is a simplified step-by-step guide. If you have never performed a heart rate drift test before, or need detailed instructions, follow the in-depth instructions with explanations.
- TREADMILL AND WATCH
Set the treadmill to either 3% (jog) or 10% (hike). Start recording your heart rate on your watch or device. - WARM UP
Warm up for about 15 minutes; you should feel like you’re about to start sweating. Gradually increase pace until HR stabilizes for 2-3 mins at just below Aerobic Threshold (AeT). Click the Lap button on your watch. - TEST
Once dialed in pace and grade, start recording heart rate, stay at pace for 40-60 mins. - END TEST
Click the lap button on your watch and reduce your pace to cool down for 10 minutes or so.
ANALYZING YOUR RESULTS with TrainingPeaks Premium
ANALYZING an indoor test
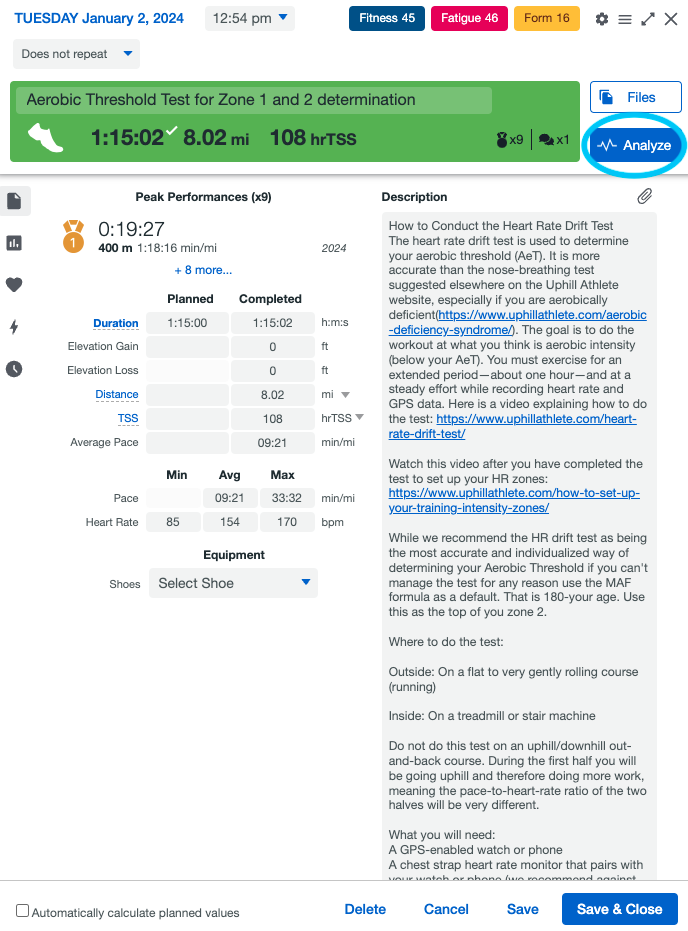
- Open the training session in TrainingPeaks and click the blue “Analyze” button in the upper right.
- Taking care to exclude the warm-up and cool down, click to highlight the workout. One of the easiest ways to do this is to select the time between the laps that marked the end of the warm-up and the end of the test.
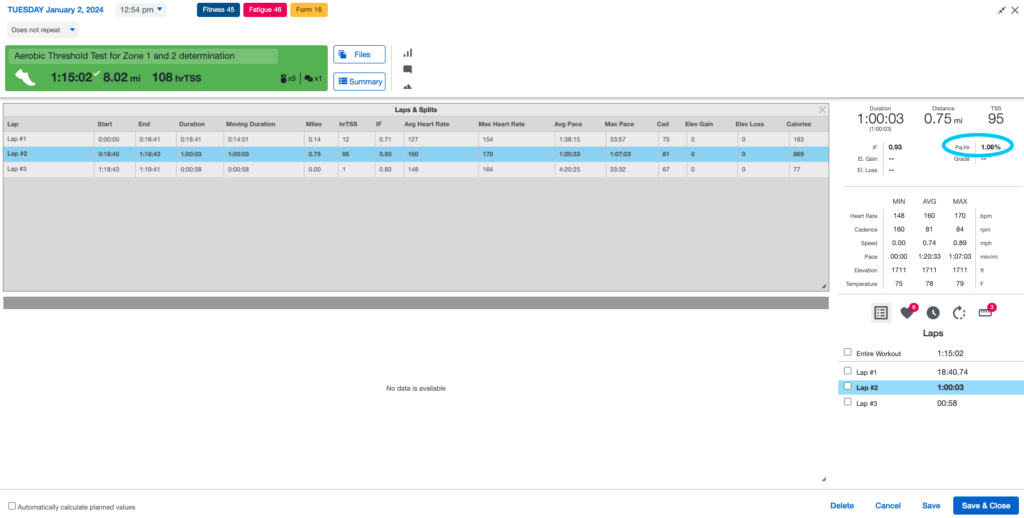
- Find Pa:Hr number. In the case, it’s in the right sidebar in the screenshot above: 1.06%.
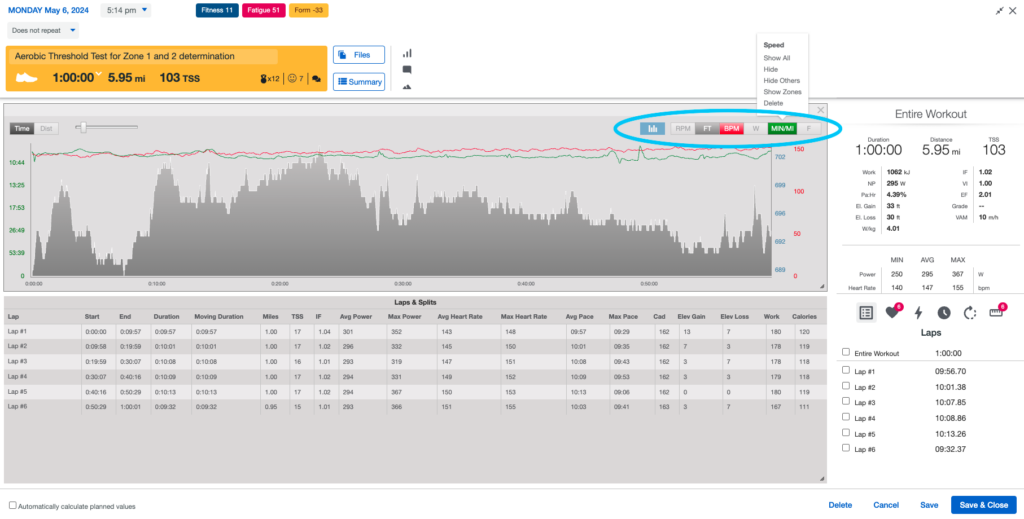
ANALYZING an outdoor test
- Open the training session in TrainingPeaks and click the blue “Analyze” button to the right of the workout title.
- Find and click on the little bar graph to the right of the FILES button. You will get a pop up menu to show up. Then click GRAPH to get the right view.
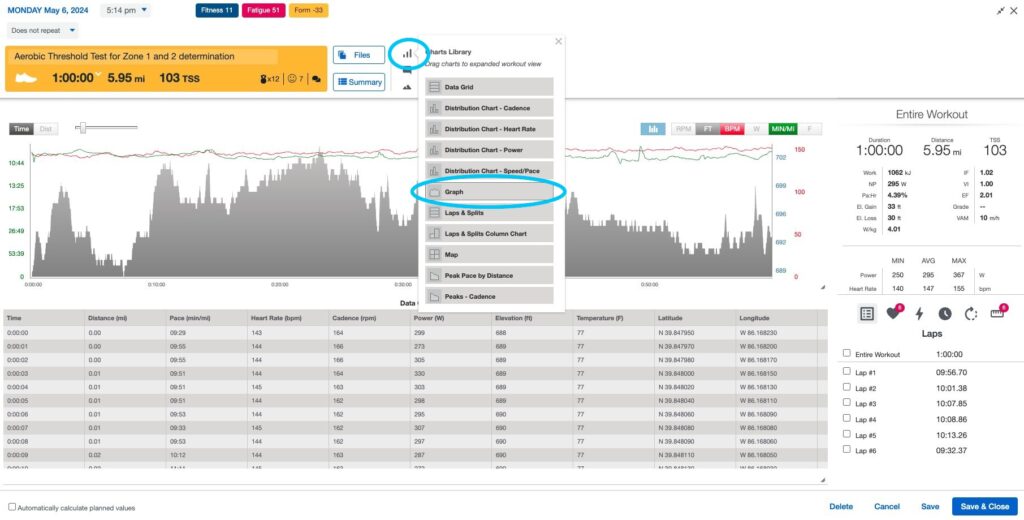
- Once in graph view, your screen should look like what you see below. Notice the buttons above the graph: RPM FT BPM W MIN/MI and F.
You need to have FT, BPM, and MIN/MI selected. Do this by hovering over FT, BPM, and MIN/MI to make sure they are showing. FT will make the jagged bar graph that is all gray. BPM will make the red line appear. MIN/MI will make the green line appear.
You can have more selected but it just makes it harder to see what is important to the test, which is elevation gain/loss, heart rate, and pace.
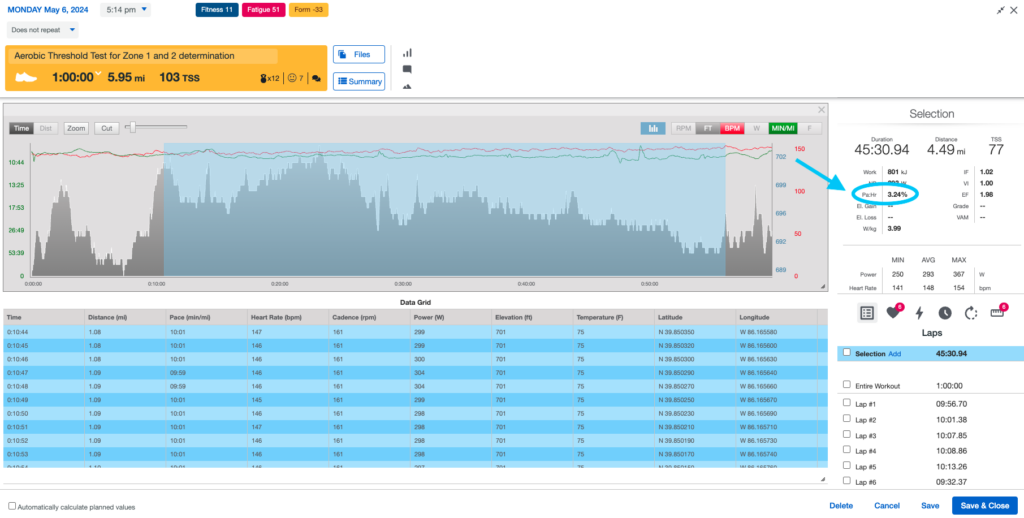
- Find Pa:Hr number.
The blue highlighting will appear when you click and drag over the part of the workout you want to analyze. In this case, I started when the warm-up was complete and the test began. And I end where the test ended. I know where the warm-up ended and where the test ended thanks to comments from the athlete. If you used the lap function on your watch to demarcate the end of the warm-up and again to mark the end of the test, you get a cleaner data set.
Now, the moment you’ve been waiting for. Read the number after Pa:Hr. In this example, it’s in the right sidebar underneath the big 45:30.94 number and reads 3.24%. That number is what we’re trying to get!
interpreting your results
3.5–5 percent difference in two halves
You have determined your AeT heart rate, which was your starting heart rate for the test. Set that as the top of Zone 2 in your TrainingPeaks zones. Subtract 10 percent from this and set that as the top of your Zone 1.
0–3.5 percent
The workout was within your aerobic intensity zones, but you should do the test again at a starting heart rate that is 5 beats per minute (bpm) higher.
>5 percent
Your initial heart rate/pace was above AeT. Redo the test using a lower starting heart rate. It may take several attempts to nail a decoupling that is slightly less than or equal to 5 percent.
DETAILED INSTRUCTIONS (best for first-time users)
- Warm up for 10-15 minutes.
Set the treadmill to either 3% (jog) or 10% or higher (hike).
Begin with a warm-up that lasts about 10-15 minutes, allowing your heart rate to stabilize. Start off walking and slowly increase your pace. This is critical and not to be skipped.
Veteran test takers: For those of you who have done the test before, your instructions are to gradually increase your pace until you get to a stable heart rate for 2-3 minutes just below your last known Aerobic Threshold (top of your current zone 2).
We recommend that you record your warm-up heart rate so that you can make sure the test is recording. - Start the test.
Once you have dialed in pace and your exertion feels stable, START recording your heart rate and stay at pace for 40-60 minutes. More is usually better but don’t overthink it. If you only have 40 minutes, do that. We don’t recommend relying on tests less than 40 minutes long.
Confirm that your heart rate monitor is functioning and recording.
First time test-takers. Your target is to maintain a constant pace and effort over consistently steep or flat terrain. Don’t slow down or speed up. So the best way to do this is to set a pace that feels easy and relaxed—a conversational pace. In other words, you should be able to carry on a conversation in full sentences.
Veteran test takers: If you already know your past Aerobic Threshold (top of Zone 2) then you can build up to that pace over the warm up and then go by your feel. Set a pace that As always, maintain a constant pace and effort over consistently steep or flat terrain. Don’t slow down or speed up. - Record the data.
Use a chest strap HR monitor to continuously record your heart rate to your GPS watch or phone throughout the duration of the test.
Note: Treadmill users! If you’re using a treadmill your GPS watch will not record the distance traveled since you won’t be going anywhere. Try to note the mileage/kilometers when you’re half-way through your test time as well as the total distance at the end. What you’re looking for is that you hiked the same distance in the first and second half.
If you use a treadmill your data may look different than an outdoor test, it may look like this:
CONCLUSION
regular monitoring
Benefits of the Heart Rate Drift Test
The heart rate drift test is a helpful tool for the following reasons.
- Simplicity. Unlike lab-based tests like gas exchange measurements, the heart rate drift test can be conducted with just a basic heart rate monitor and a suitable environment.
- Convenience. It can be performed almost anywhere—on a standard treadmill or a flat outdoor track with minimal equipment.
- Adaptability. The test can be performed over regular intervals to continually assess training progress.
To learn more about other options for aerobic self-assessment, read our article.
By assessing heart rate drift over a training period, athletes can make informed adjustments to their training intensity zones, ultimately leading to better performance and efficient energy utilization during longer sessions. For a detailed guidance on performing the test and interpreting its results, athletes can refer to our comprehensive video tutorial or reach out to our coaching team for a phone consultation.
The Heart Rate Drift Test
Table of Contents