While it’s great that running and hiking are both simple and do not require much gear, the shoe is a very important piece of equipment that causes trouble if not replaced often enough. Running shoes are designed to last between 200 and 500 miles. That may sound like a lot, but even the higher end of that range comes quickly with regular training. With really good form and specific strength, a runner can get by with dead shoes for a limited time. But most people quickly head down the injury road without proper footwear. When an athlete starts feeling a muscle or tendon, the first thing I ask is how long they’ve had their shoes. Checking and replacing your shoes is an easy variable to rule out before making dramatic changes to training or scheduling diagnostic appointments. So what’s in a shoe?
Anatomy of a Running Shoe
Beginning with what touches the ground, the three parts of a shoe are the outsole, midsole, and upper. The outsole is pretty simple: a firm rubber layer with lugs for good traction. The midsole is made of foam and serves as both the cushion and support for your body, which we’ll focus on below. The upper holds your foot into the shoe and isn’t too relevant other than comfort (e.g., not having stitches that hit your foot in weird ways). Let’s take a closer look at the midsole.

The Midsole
The midsole provides two things: cushion and support. Ideally when you walk or run, your foot is relatively in line and the wear pattern will be through the middle of the sole. In reality, we all have little imbalances that are often reflected in the wear pattern. If you look at your shoes from behind, you might see that they tilt one way or another—perhaps in toward the floor with the medial part of the shoe wearing more quickly, or out so that the lateral part of the shoe wears more quickly.
When the wear pattern is toward the inside (the inside of the heel, with the ball of the foot tilting toward the floor), you’re putting more stress on the medial part of your foot. You aren’t getting support from that part of the shoe, and it is possible you are feeling something in your knee, Achilles, or elsewhere. If the outer part is worn, then you’re likely very tight in the hips and not getting enough cushioning there. This simple evaluation gives you an idea of your foot mechanics, which can help you determine which type of shoe might work best for you.
Proper Fit for Your Foot Mechanics
I recommend a road running shoe for any indoor training—whether you’re training for running or mountain climbing (at least in the early phases of training before using your mountain boots)—as they give you the most specific fit and function. There are three categories of fit: neutral, stability, and motion control.
Neutral
A neutral shoe has the same density of midsole foam all the way through the shoe, meaning the shoe does not try to guide your foot in any way. If you have a high arch that remains high even as you weight your foot, or your wear pattern is on the lateral part of the shoe, a neutral shoe is the best choice.
Stability
A stability shoe has denser foam on the medial side (called a medial post) of the shoe compared to the lateral. As you move, your foot naturally goes to the softest part of the shoe, so the post serves to guide your foot to a more aligned position. If you know that you have a flexible arch that collapses as you move, this kind of shoe will help you stay in alignment and can improve medial knee pain as well as various other soft-tissue issues.
Motion Control
A motion control shoe is designed for someone whose arch collapses dramatically as they walk, so it has a very dense medial post that spans almost the full length of the shoe to guide the foot.
If you’re on trails most of the time, picking a shoe is much simpler. Since the terrain is more varied, trail shoes have a more neutral midsole to allow your foot to move in different ways. Each company makes high-quality shoes, so finding the correct fit is the most important thing.
Sizing: Arch Length and Flex Point
We are all familiar with the standard toe-to-heel measurement “size,” but we often don’t know our arch length. Arch length is the measurement from the heel to the distal part of our arch at the ball of the foot (the widest part of our foot and where the foot flexes). It can often be a size (or more) larger than our foot length.
Like our foot, each shoe also has a flex point, which is the widest part of the shoe. (You can grab your shoe and push the toe end down onto the floor and mimic walking to see where it naturally goes.) BUT! If you’re putting the widest part of your foot into a shoe that is too small for your arch length, it will feel too narrow. The widest part of your foot should match the widest part of the shoe. I worked at a running store for several years and we had countless people tell us they had wide feet and needed wide shoes, but when they were fit for their arch length, a normal-width shoe felt and fit great.

When to Replace Your Shoes
Once you have the right kind of shoe that fits your foot well and matches your body mechanics, the final thing to keep in mind is when to replace them. The most straightforward manner of doing this is by tracking their use manually or in TrainingPeaks. I know some people who will mark the date they started using a shoe inside the tongue, or log it in their training log. In TrainingPeaks, go to Settings in your account, enter your shoes under the Equipment tab, and choose a default. TrainingPeaks will automatically track mileage, but remember that 10 mountain miles can take twice as long as on the road, so I equate an hour to 6 miles. If you wear your shoes for any other activity (which I don’t recommend), use the same calculation.
My other favorite way to see if you need new shoes is to simply try on a new pair. You might not realize how dead the cushioning is until you try a fresh pair.
Finally, many specialty running stores have systems in place to keep track of what shoes you’ve used, and when you bought them. This can be very helpful and is another reason to support your local specialty retailer.
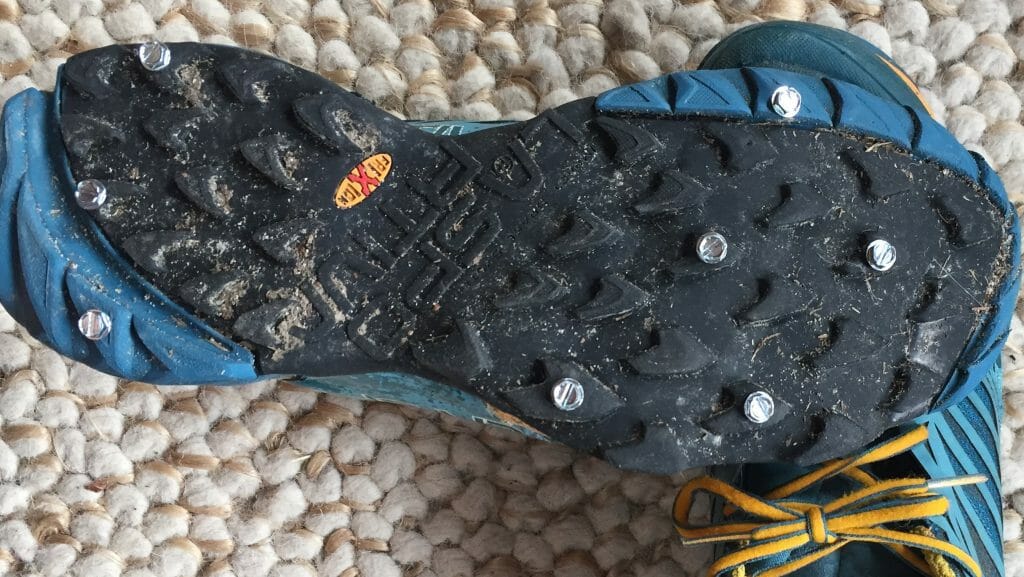
Winter Running: How to Screw Your Shoes
Spring races come fast. While skiing all winter is awesome training for trail running, continuing to run a bit through the winter keeps your legs used to the impact so that when the snow melts, you can get out for as long as you need. For the months when roads become packed snow-and-ice, you can dedicate a pair of shoes for winterizing and be good to go. Microspikes are fantastic for really icy conditions, or if you live in a place where trails are heavily used and the conditions freeze and thaw frequently. For locales where there is snow on the ground all winter, however, fresh snow refreshes the surface enough that Microspikes can be overkill.
Screw It
Modifying a pair of shoes with sheet metal screws gives you flexibility to have as much or as little additional traction as you’d like, and you can customize the placement based on how you land when you run. The screws are cheap and lightweight, and they don’t need to be taken on and off like Yaktrax or a similar type of traction. Additionally, if you still have life in your shoes after winter, simply unscrew them and keep on running.
The main thing to keep in mind is to have them short enough that they won’t poke through your midsole: 3/8-inch ones work great. Even with a more minimal shoe, you won’t feet the screw from the inside.
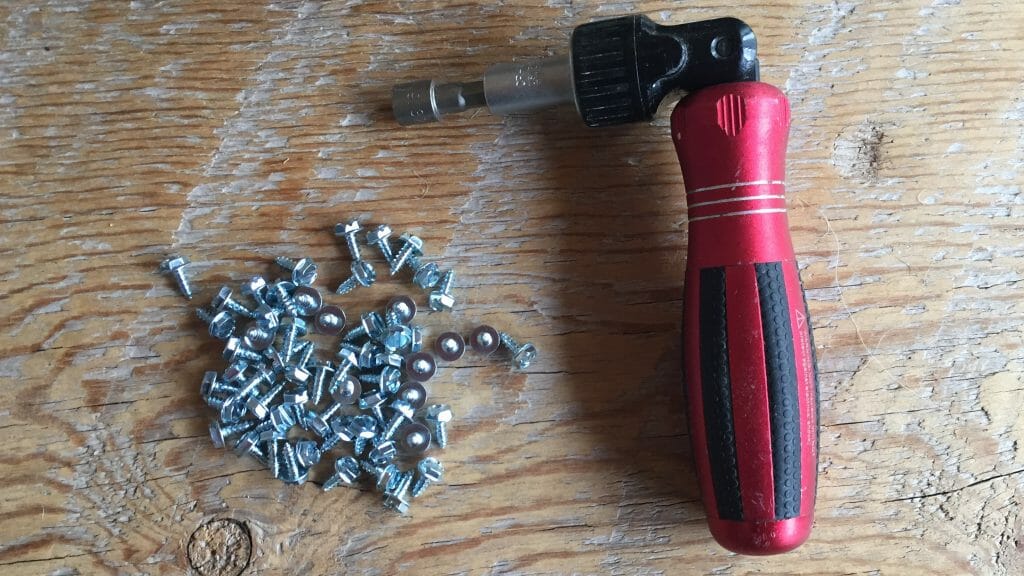
A few well-placed screws go a long way. I put them at the heel and the midfoot/ball of the foot. I tend to be on the lateral part of my foot so I place one a little lower than right at the ball of the foot on the lateral side. If you know that you land differently, you can put them at the spots that see the most contact with the ground.