Whether you are training for Everest, Rainier, Mont Blanc, or a Colorado 14er, the physiology of endurance is universal. A mountaineering training program builds aerobic capacity first, adds functional strength, then develops climbing-specific muscular endurance. The timeline, volume, and intensity targets change with the objective, but the architecture does not. This article covers the full methodology — from self-assessment through tapering — with enough theory that you understand the why behind any good mountaineering training plan.
“Fatigue makes cowards of us all.” Vince Lombardi said it about football, but it is even more true in the mountains. Fatigue is the single biggest controllable limitation between you and both success and safety. Speed equates to safety: the quicker you are up and down, the less chance you will be caught by a storm, encounter warming temperatures, or increase your exposure to objective hazards. Traveling fast over complex terrain requires both a high level of technical competence and the endurance to support it. Climbing technique must be developed over years of practice by climbing ever more challenging routes and mountains. Skilled guides and trusted climbing partners are the best people to refine your technical skills.
The Key Components of Mountaineering Fitness
To back up, and see the big picture of training for mountaineering, we can identify the following key pieces of the fitness puzzle for mountaineers:
- Aerobic capacity: This is the ability of your metabolism to power many hours of climbing without fatigue or running out of energy. Sometimes called cardiovascular exercise, but please, don’t call it cardio.
- Strength: In the most practical sense we need to understand that speed is directly proportional to strength. The force with which you push down into your boot determines your upward velocity. The term strength is used to cover everything from core strength to a variety of mountain climbers exercises.
- Muscular endurance: The resistance your legs have to fatigue. Good muscular endurance, also sometimes called strength-endurance, is what allows a muscle to do thousands of repetitive movements. This is one of the most important contributors to mountaineering fitness.
- Form/technique: This is the mountaineer’s efficiency at moving over the terrain. Inexperienced climbers will require a lot more energy (and subsequently fatigue sooner) to make up for lack of good technique. The technique of mountain climbing, which involves moving over uneven and rough can only be learned on mountainous terrain.
Our training methodology will lead you through the correct way to improve your Aerobic Capacity, Strength and Muscular Endurance. Starting with simple, general training and moving to increasingly complex, specific workouts as the goal event approaches.
The Three Principles of Endurance Training
Consistency – You must train consistently. Long breaks followed by flurries of motivation and activity are far from ideal and do not build fitness. Consistency is the single greatest predictor of success. To take it one step further, developing consistency is what makes you into the person that can climb mountains. Getting to the summit will be the proof that you became a climber, but you will have become a climber by engaging in consistent training.
Gradual Progression – The training load must gradually increase over time. As you become fitter, the same training load will not produce the gains it did a few weeks ago.
Modulation – A good training plan will progress in a wave like manner with some hard weeks followed by easy weeks and even with weeks; hard days followed by easy days. For training to work you must understand that training is far more than the workouts. Training is the adaptations to the workouts. And the adaptations happen at the metabolic level in the time between the workouts.
The Difference Between General and Specific Training
Broadly speaking, there are only two types of training for any sport.
1) General Training. The general conditioning that readies you for event-specific training. Examples being hiking or weight lifting. These do not look a lot like mountaineering exercises but form an important part of the training program.
2) Specific Training. This is training that mimics many, most, or all of the demands of climbing a mountain.
General Training consists of a mixture of strength training and endurance trainingand will not look at all climbing-specific. This is helpful to know, especially if you don’t live near the mountains. The two goals of this training are building aerobic capacity and increasing basic functional strength for injury prevention and proper movement.
It is important to understand that the role of General Training is not intended to be of immediate benefit to your climbing. Its purpose is to generate a base of support to do the specific workouts and the training for climbing. General conditioning prepares you for training.
Specific Training consists primarily of climbing mountains or climbing workouts that are designed to directly model mountaineering. Ideally this does include actual mountain climbing on peaks smaller than your goal-climb. It may also include more creative acts of training such as climbing stadium steps wearing boots and a heavy backpack. The two goals of this type of training are building aerobic capacity and increasing and increasing muscular endurance.
Aerobic conditioning is the foundation
Mountain climbing is an aerobic sport. Because a climb takes hours, or days the energy needed to keep you moving is supplied by the aerobic metabolic system. This means that your body uses oxygen at the same rate you are able to supply it to the working muscles. Climbers, except in rare emergencies, don’t sprint, and rarely rely on the anaerobic metabolic pathway. Because aerobic fitness is such a dominant factor in mountaineering it logically follows that it will be the chief focus in our training.
How to assess for aerobic fitness
Why is this important? Understanding your body’s metabolic response to exercise allows you to establish customized (unique to YOU) training intensity zones which gives purpose and control to the individual training sessions. It is hard to get to an end goal if you don’t know where you are starting from. For a complete discussion on various methods available to you for establishing these baseline values please read this our article about aerobic and anaerobic self assessment.
This is the first concrete step once you’re ready to start training. Assessing both your Aerobic and Anaerobic thresholds are important tasks for every mountain athlete. This is how you will correctly define your training intensities for different workouts in general, and also for mountain climbing.
With these simple tests you assess your current aerobic fitness for several purposes:
- To determine appropriate aerobic training intensities and ultimately by establishing training zones. Training zones will be explained later.
- To find out whether or not an athlete is Aerobically Deficient.
- To measure future progress in aerobic capacity development.
- Note that you will need a recording heart rate monitor with a chest strap. Wrist based HR monitors, will not provide accurate HR data.
We advocate that you perform these two tests within the first month of training to get a picture of your personal aerobic response to different intensities. The first (and for mountaineers the most important) of these tests will pinpoint your Aerobic Threshold (AeT), which you reach at a rather low intensity. Aerobic Threshold can be determined by a number of different tests, each one discussed in the above linked article. The Aerobic Threshold test is the first workout you should do.
Anaerobic Threshold is the second test, also explained in the above linked article (Anaerobic Threshold (AnT), is also often called Lactate Threshold). Your AnT sets the top of your Zone 3. This is often done as a workout and is easy to execute, simply go as hard as you can for no less than 60 minutes.
Aerobic Threshold Assessment
Assessment of the aerobic system’s capacity for providing the needed energy can run from expensive laboratory tests to formulaic educated guess. The following article gives a detailed discussion of the common options for determining your Aerobic Threshold AeT. We’ve presented them from least to most expensive and discuss their pluses and minuses.
Here is an in-depth article on Aerobic Self Assessment Tools
Re-Testing Aerobic Threshold
It is a good idea to re-test aerobic threshold approximately every 8-12 weeks if you’re training regularly. The reason being that your training heart rate zones will change, specifically your Aerobic Threshold heart rate will become higher. We wouldn’t recommend testing it more often than at six week interval as it will be hard to see any significant improvement in shorter timeframes. If you’re working with a coach or training in a training group you can lean on your coach to adjust your training zones as they will be able to see your changing fitness in routine workouts and will adjust your training zones more frequently.This is the main reasons we are such fans of the HR drift test for aerobic threshold testing. It is easy, free and allows direct comparisons with previous tests.Keep in mind that when trying to improve your aerobic threshold, these are the most important factors:
- Individual response: Different people respond at different rates;
- Total volume: The more aerobic training the better as long as it doesn’t interfere with recovery;
- Avoiding high-intensity: Especially with athletes suffering from aerobic deficiency often related to over-indulgence in HIIT training, it’s important to avoid high-intensity in the initial training period (8-12 weeks for most non-elite athletes).
What are heart rate training zones?
The idea of a heart rate zone system for defining and controlling the intensity of endurance training is as old as the earliest portable HR monitors introduced by Polar in the early 1980s. Although you can find many different zone systems with varying definitions of the zones, the following chart explains the system we use (also the most common). We firmly believe that by anchoring this zone system to two important metabolic markers (the aerobic and anaerobic or lactate thresholds (AeT and AnT) this approach does a good job of personalizing intensities to your unique metabolic response to the various intensities.
Zone 1
Heart Rate: AeT-20% to AeT-10%
Perceived Effort: Very easy to easy
Training Effect/Purpose: Aerobic conditioning and recovery
Metabolism: Aerobic-fat
Muscle Fiber Recruitment: ST
Training Method: Continuous 30 min to several hours
Zone 2
Heart Rate: AeT-10% to AeT
Perceived Effort: Moderately hard for those with high AeT, but easy for those with low AeT
Training Effect/Purpose: Aerobic capacity, economy
Metabolism: Aerobic-fat dominates, maximum fat utilization
Muscle Fiber Recruitment: Most ST
Training Method: Continuous 30–90 min
Zone 3
Heart Rate: AeT to AnT/Lactate Threshold
Perceived Effort: Medium, fun-hard not exhausting. Sustainable.
Training Effect/Purpose: Aerobic capacity, anaerobic capacity, lactate shuttle, economy
Metabolism: Glycolytic/anaerobic begins to dominate
Muscle Fiber Recruitment: All ST + some FT
Training Method: Interval 10–20 min, continuous to 60 min.
Zone 4
Heart Rate: AnT/Lactate Threshold to maxHR
Perceived Effort: Hard, max sustainable for several minutes
Training Effect/Purpose: Maximal aerobic power, strength/speed endurance, economy, technique
Metabolism: Both aerobic and anaerobic capacities maxed out
Muscle Fiber Recruitment: All ST + most FT
Training Method: Interval 30 sec–8 min
How do you test your anaerobic threshold?
To be clear, the first step in any training plan we create is determining Aerobic Threshold. The Anaerobic Threshold testing can wait a few weeks. Typically we do this in the fourth week of training because most athletes do not train any high intensity before the fifth week (at the earliest).
Your Anaerobic Threshold (sometimes called Lactate Threshold, or LT) represents the highest power output, speed, or heart rate that you can sustain for an extended period (30–60 minutes). It is the definition of endurance, personalized to your physiology and activity. While lab tests (both Gas Exchange Tests and Lactate Tests) will often claim to pinpoint this, we advise skepticism. Such tests, of necessity, keep you at any given intensity stage for only a few minutes before raising the intensity to the next level. The insufficient duration-at-each-intensity used by that protocol undermines the determination of what is supposed to be a long-duration threshold. Instead, we prefer the following field test.
Field Testing of Anaerobic or Lactate Threshold
Unlike the AeT test, which is conducted at low to moderate intensity, this test requires you to go as hard as you can for between 30 and 60 minutes (we will link you to another article that gives a full treatment shortly). You will want to use the most event-specific test you can arrange. In other words, Mountaineers and alpinists should do a very steep uphill hike. If you are limited to indoor options, then a steep treadmill (15%) is the best option (better than stair stepper or stair mill.)
Your average heart rate during this test will be, by definition, the maximum that you can sustain for that duration.
This test requires maximal output so you need to be physically and mentally ready for a hard, all-out effort.
Here is a link (when you are ready) to our Step by Step Guide to Determining Anaerobic Threshold
The Bottom Line
With proper training, your Aerobic Threshold and Anaerobic Threshold will improve in terms of both heart rate and the speed with which you can move at those heart rates. As we said at the beginning: It is important to know where you started if you want to be able to chart your progress and know where you end up. But, it is also useful to have some ways of assessing your current position during this journey. These tests are all meant to allow you to monitor progress in your aerobic development.
What is the best workout for mountaineering?
Many people mistakenly think that mountaineering training workouts consist primarily of hiking in hilly terrain with heavy pack or doing lots of mountain climber exercises in a gym. You might be surprised to learn that some of the fittest and fastest high altitude mountaineers do the bulk of their training running on mountain trails with minimal added weight. [To be clear; running for training is not a necessity in any of our mountaineering training programs]. Carrying a pack is important but we feel it is over used by many mountaineers and carries a significant risk of injury. Our approach includes heavy pack carries but perhaps not in the way or to the extent you might imagine.
In reality, few people live near enough to mountainous terrain to make a high volume of hiking in the mountains a viable option all of the time. Most of us are limited to more gentle terrain where trail running is a perfect training modality. Don’t despair if you live in a terrain challenged location. Indoor training options that simulate some of the demands of mountaineering have worked well for thousands of Uphill Athletes. Options include stair machine (like Stairmaster), stairs in a tall building, stadium stairs, incline trainers, and treadmills that can go to at least 15% are all useful training tools that will get the job done. Of all these typical gym training tools (treadmills, elliptical and stair machine) the stair machine is the closest simulation because you have to step steeply (about 60% grade) up against gravity lifting your full weight. Bear in mind that with these stair machines the step moves down as you step up. This means that you really only lift your entire body weight about 1/2 of the height of the step. That’s how your body manages to stay in the same place as the stairs move under you. If this was not true you would embarrassingly hike right off the upper end of the machine. This makes these tools somewhat less effective for mountain climbing workouts than climbing a long set of stairs but many people do not have access to buildings with 10 or more floors. Treadmills are more common in most gyms but most will only go to 15%. Your mountain goal will surely be much steeper than 15% so reserve the 15% treadmill for when it is the only option or for easier aerobic days.
The other excellent indoor-choice, but last resort for obvious reasons of boredom is a sturdy wooden box; simply step up and down. This is a great exercise because you can step on and off all four sides of the box, working every direction. Remember that when you are cramponing up a frozen glacier, you are mostly turned to and ascending sideways. It is relatively rare to step straight up during a climb.
Note that if you use a box it should be about 75% of the height of your shin bone.
Whatever you choose: running, hiking, treadmill, stair machine, stair hiking, box or a combination of these, this will form the bulk of your training time. We will also simply refer to all of this as aerobic base training.
How do you incorporate pack weight into training?
Even the most advanced climbers will start their first hikes un-weighted and gradually a weighted backpack will be incorporated. Remember the principle that training starts off in a more general fashion and becomes more and more event specific as you approach your mountain goal. This holds true with mountaineering training. Starting mountain climbing training without weight for at least 4 weeks (16 aerobic workouts and more is better if you have time) gives your body a chance to build some basic fitness and then we can start to add specificity and greater challenge.
Keep in mind that these progressions may appear conservative. However they follow the most fundamental and well-established principles of endurance training. Gradualness of progression is one of those principles. And frequency (consistency) of training stimulus is another.
Pack Weight
As mentioned above we recommend a minimum of four weeks of training, or 16 aerobic workouts in a 4 week period as a minimum number of mountaineering workouts to complete before adding weight. After that weight should be added gradually. Start light, 10% of body weight adds a lot of extra pounding to a pair of knees over ten miles of hiking. Then add the weight gradually.
| Week 1 | Week 2 | Week 3 | Week 4 | Week 5 | Week 6 | Week 7 | Week 8 | Week 9 | Week 10 |
| 0 | 0 | 0 | 0 | 5% Body-weight | 5% Body-weight | 10% Body-weight | 10% Body-weight | 15% Body-weight | 15% Body-weight |
Note that athletes on the lighter side (below 120lbs) will be wise to increase pack weight more aggressively. 5% of 120 pounds is only 6 pounds, and 20% is only 24 pounds. These athletes should carry an additional 3% to get to pack weights that train you properly for the reality of a mountaineering backpack.
We do not recommend doing your heavy pack carries on your longer hikes. We don’t want you doing 4-5 hour hikes with 50lbs. It is not necessary and you may injure yourself. You will do some very heavy pack carries during our special muscular endurance workouts. Please believe us that this training, in combination with the strength training, will prepare you very well for the heavier packs of your climb. The max pack weight we typically recommend for aerobic base training hikes tops out at 25% of body weight, and this is only for the most fit and well trained mountaineers.
If you go heavier than this you tend to (typically without realizing it) start to train a different energy system, Muscular Endurance, which we mentioned in the opening paragraphs. It is always a mistake to mix up the purposes of different workouts. Keep in mind that the long low intensity hikes with 20% of body weight are aerobic base training; they are not meant to have a profound muscular endurance training effect. To get slightly ahead of ourselves, as you advance past 16 weeks/four months of continuous training, the role of these workouts is to maintain the aerobic base while in the Muscular Endurance phase. Once you get that far along into training there will be weeks where the most important workouts are a Muscular Endurance focused. And on those weeks most climbers will need to carry 40-70lbs or a weight that will cause local muscular fatigue to be the limiting factor. More on Muscular Endurance Training later.
How to structure rest and recovery
We have the best success with most athletes training 6 days a week, four of those days are aerobic training, 2 are strength training, and one is a full day off from any form of training. A rest day. Most athletes take these on Monday because the weekend will often be the time when you can get in the longest or most demanding training sessions.
Periodic easy weeks are also necessary. Typically these occur every third or fourth week. More frequently for the less-training, and less frequently for the well-training.
Modulation
Remember the third fundamental law of endurance training? It is modulation. Modulation simply means that the training load, or overall work you’re doing in training is modulated over time. This means the training load must increase according to the first two principles (frequent stimuli whose duration is increased gradually). Most commonly we progress training load for 3 weeks in a row. Then we prescribe an easy week that is typically 50% of the training volume (time) of the most difficult week in that block of 4 weeks.
The easy week is called the consolidation or recovery week by coaches and this week is hugely important to give your body enough time and energy to fully recover from training and build new structures in your body. Meaning building more mitochondria, greater bone density, manufacturing more red blood cells, create new and more dense capillary beds in the muscles you are training. These structural changes are necessary, important, and invisible. Yet they take a lot of energy for your body to produce and we must allow a periodic rest so that it can accomplish these needed improvements.
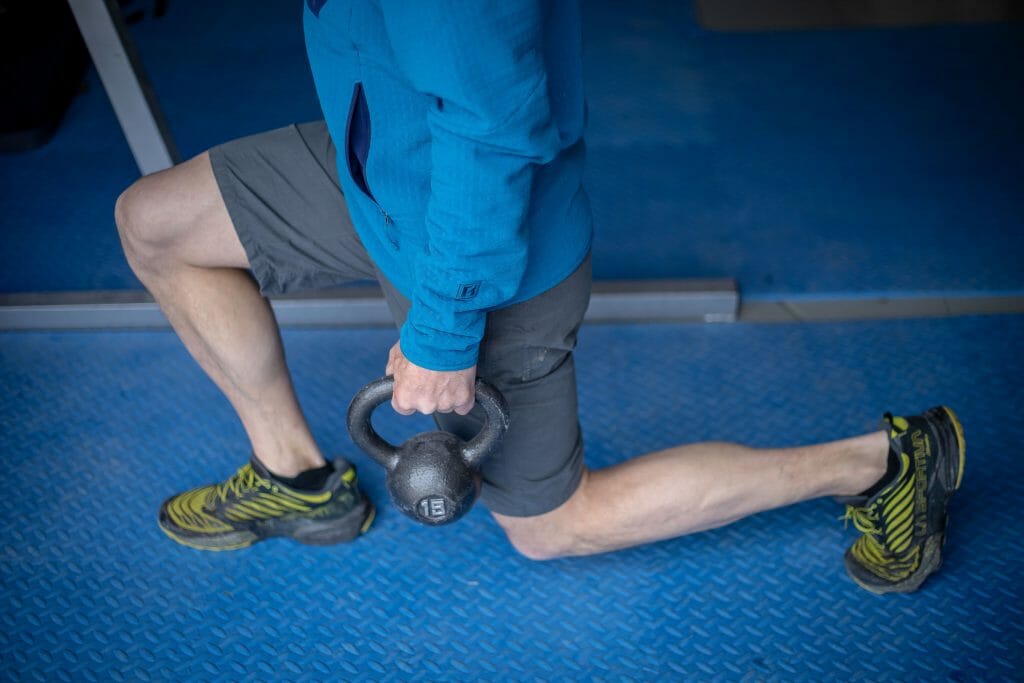
Why strength matters
Strength is a key component of endurance especially endurance where you will be carying a heavy pack for many hours. A proper strength program will help you develop into a more durable, more powerful, and more efficient mountaineer capable of moving well over a period of many hours, day after day. As with any well-planned training progression, an endurance-oriented strength regimen starts out fairly general and sharpens into something more specific over time. Ideally it should be geared toward the unique physical demands of mountaineering, stepping carefully up steep mountainsides.
What Is Strength?
In the context of sports, strength is the ability to exert the greatest force with the least effort. Under this umbrella definition, it is possible to account for a broad swath of applications—from the Olympic weightlifter who can snatch 300 pounds to the mountain runner who finishes a marathon with 8,800 feet of climbing in 3:45 (as Kilian Jornet did in July 2017). In both cases, the athlete overcomes some form of resistance; they leverage an ability—their “strength”—to accomplish that load with great efficiency. However, they are drawing upon very different sport-specific strength qualities to resist and overcome gravity. For the weightlifter, that quality is their maximal explosive power. For the mountain runner in the above example, as for a mountaineer, it is the ability to generate sub-maximal forces for hours on end without a diminution in those forces. This is where those muscular endurance workouts come in.
Speed As Strength
Even in endurance sports as opposed to sprint events an athlete’s speed depends to a large extent on their power (the rate that strength is applied), which is rooted in their strength. In order to move faster up and down a mountain, you need to be able to create higher forces (strength) in the locomotive muscles, and you need to be able to do so more quickly.
Mountain Strong Is Not Gym Strong
It is worth mentioning that for many the term strength training conjures images of muscle-bound gym-goers grunting out bicep curls in front of a mirror or chasing a new one-rep max on the bench press. Banish that from your mind, because that is not what strength training should look like for you as a mountaineer. You need to develop climbing-specific functional strength for mountaineering. The last thing we want you to do is create bulk you’ll then have to haul up a mountain, or route. You simply can’t afford to gain strength at the expense of adding appreciable muscle mass. (Note, there are individuals who can benefit from adding muscle mass, but they will want to consult with a coach because their training is more nuanced.)
How Strong Is Strong Enough?
In mountain athletics, weightlifting should never be an end unto itself. Spending undue time and effort on general strength can deprive you of the greater benefits gained through specific training. Plus, it is possible to become too strong.
Take the back squat, for example: Improving this strength—up to a point—will translate to better mountaineering performance. We don’t want to pass that point. For the curious, we never train athletes to lift more than 2x body weight in the back squat or deadlift.
For a fuller treatment on strength training and the mountain athlete, pick up our book.
And note that the older you become the more strength training should be prioritized. If you’re over 40, this means YOU should take a moment to read this article.
How much training do you need per week?
It is well understood that one of the greatest stimulus to develop aerobically is the duration and frequency of training. Therefore a minimum 4 aerobic workouts per week will be needed for almost all athletes. Less than this and the time between the training stimuli will simply be too long and your body will de-train and you will either stay the same or loose aerobic conditioning. This is why when you only exercise on the weekends you de-train over time, no matter how big you go on the weekend. Here is an article that goes into a full explanation of the weekend warrior phenomenon.
How much time per week?
How much training stimulus you need to improve your fitness depends on how fit you are to start. Un-trained people with a higher BMI, typically start with 5 hours of training time per week spread over 6 days. Prospective mountaineers with a lean-looking figure, less than 10 extra pounds, typically can start with 7 hours of training time per week. Also distributed over 6 days. Fit, active people who can jog 10 miles without interruption probably will need to start with 8-10 hours per week. Note that these times include time for both aerobic conditioning and strength training.
How long does it take?
The minimum effective training plan is 8 weeks. The longer the better. The reason there is not a 2 or 4 week training plan that is effective is the fact that aerobic training makes significant changes to your metabolism as well as your body, from the cellular to the skeletal levels. There are no shortcuts to building aerobic fitness. If there were they would have been discovered long ago. If you want to understand more about what happens in your body during training, we recommend reading this overview of training for Everest, even if your goals are much more modest, the training works the same way.
We feel it is important to reiterate that anyone who tells you there is a shortcut to endurance fitness of this type is either ill-informed or selling snake-oil. The fitness demands of a multi-hour or multi day climb will not be adequately met by doing gym based high-intensity training, Crossfit, building massive leg strength, power yoga, or spin classes. Endurance training has been studied and practiced for well over 100 years and there is truly nothing new when it comes to the best way to do it.
So if eight weeks is the minimum, what is the maximum? 10 years. It is well known that adults can continuously develop their aerobic systems for approximately ten years. Look at the age of world-record holders in marathon and ultra-marthon events. They’re not 22, they’re late-20’s and early 30’s. And this is the reason.
But you don’t have 10 years to train to climb Mount Rainier, and you want to climb it next summer. The simple reality is that the sooner you start training, the fitter you will be when you clip on your crampons. If you have 8 weeks, use that. If you have 24 weeks, use that. And yes, you can build from year to year, even well into your 50’s and possibly 60’s. There is no such thing as being TOO fit for these climbs.
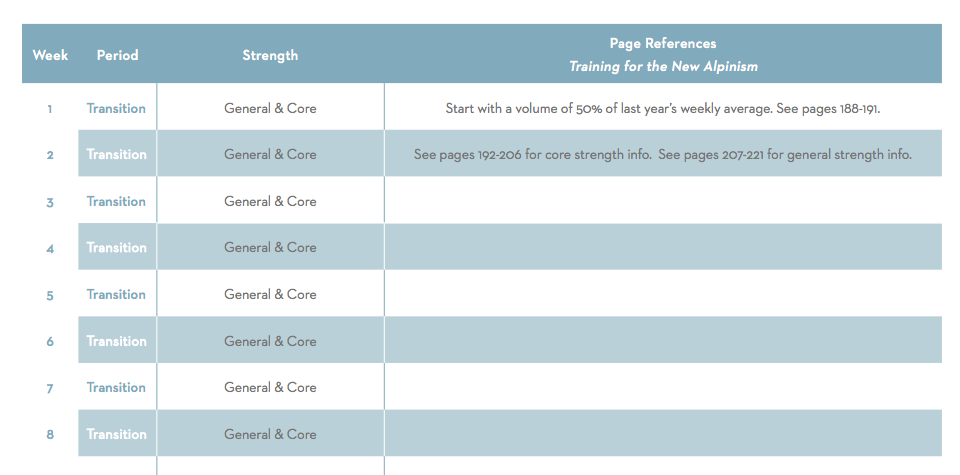
How to plan your training
The first thing to do is lay out a schedule for a minimum of eight weeks. Below is a template cribbed from our New Alpinism Training Log. You can copy this format into a notebook or you can also buy that book. In the case of the book, a lot of the work will be done for you and it serves as a very handy training guide integrated with a notebook to record your training. And don’t forget you can share and collaborate with others on the Uphill Athlete forum pages. The outline below is intended to get you started and guide you through weekly volume increases. Use the starting training volume (hours) suggested above and adjust up/down based on how well you feel you’re handling that amount of training. We also sell training plans that are housed on a third party platform called Training Peaks which acts as an electronic training log with many other useful features.
The second eight weeks of training get a little more serious. You’ll be getting fit by now and so the training stimulus will necessarily be higher. You can follow the guidance offered here:
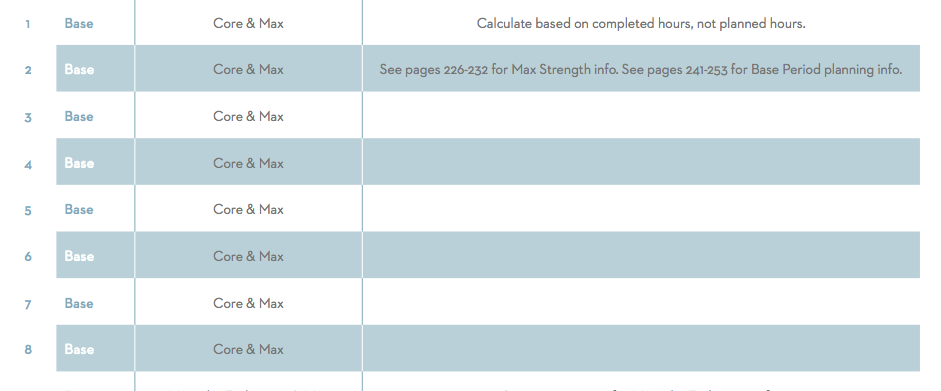
Note that page number references are for our book Training for the New Alpinism
When to add muscular endurance training
We recommend adding Muscular Endurance Training, on average, during Week 16 of your training in a 24 week plan. This stuff is really important to your success. Read the previously linked articles and follow these 3 basic rules. These are important mountain climbing workouts.
- Vertical gain: work up to about 60min if up time.
- Weight in pack: The point is to have the rate of climb be limited by local muscular fatigue in your legs, not by your breathing. You must use a steep enough hills (or stairs) and heavy enough pack to get this effect. Normal trail gradients of 10-12% grade or treadmills at 15% will no be steep enough to get this effect.
- Be prepared to spend some time finding the right place and the right weight.
More on Muscular Endurance Training:
Exercises for Muscular Endurance
Vertical Beast Mode: What Is Muscular Endurance? Why Is It Important and How Do You Train It?
Muscular Endurance, the Money Workout
How to taper before a climb
Many people begin to get nervous in the final weeks preceding a big climb. They wish they’d done more and hope to cram in extra training. This is a mistake. DO NOT DO THIS. This violates all three of those cardinal rules we explained earlier. If you have been making frequent small deposits into your fitness savings account you have done all you can on the training end of things. If you’ve not been consistently, gradually progressing your training load for the past several months the only thing that will happen with this last minute cramming is that you will potentially exhaust yourself and ruin the trip.
The weeks prior to your climb are NOT the weeks to go train extra hard. On the contrary. They are the weeks to, in coaching terms, consolidate your fitness gains by doing LESS training. What training you do execute should look like your goal climb.
Let me give you an example. Summit day on Mount Rainier via the Disappointment Cleaver route is about 4,000 vertical feet. 8 weeks out from your climb you should be doing at least one mountain climbing workout per week where you ascend 4,000 vertical feet in one day, with a backpack of approximately the same weight which you’ll carry on Rainier, typically about 25 pounds. Note that you’ll be doing these workouts after a good night sleep, in your own bed, after a solid breakfast, in comfortable, dry hiking shoes at low elevation. It is still only an approximately of the real Rainier climbing day which will follow a couple of hours of fitful sleep at 10,000’ in a noisy tent, followed by a bar for breakfast, some bad instant coffee, and feet stuffed into frozen boots attached to crampons.
If you’re doing these simulations, the physical challenge of the climb itself will be easy in good conditions and weather and give you the reserve you need to persevere in bad conditions and sub-optimal weather.
In general we recommend cutting the total training time by 50% in a taper week over what your most recent heaviest week was. For a climb of 2-3 days, a one week taper is enough. If you are going to be traveling for several days and then doing a several day trek to base camp you can probably omit a taper week and train normally right up to your departure. In that case you will use your travel and approach to base camp as your taper period.
How to track your training
Keeping a training log is useful for several reasons. It is like a journal or diary where you will record not only the data like mountain climbing exercises, mileage, time and vertical but also your perceptions of the day’s training. Having to actually write down how you felt will hopefully cause you to reflect. This log can be extremely helpful to look back on when you begin your next training cycle for the next big climb. You’ll know what worked well for you in terms of mountain climbing exercises and training but also in terms of recovery. At a minimum you should record the following:
- The amount of time, distance and vertical trained
- The intensity you trained in, typically measured by heart rate zones, as we discussed.
- How you felt about it. Was it an “A” workout or only a “C”?
You can use a pre-made log book, like ours. You can put it all into a spreadsheet. Or you can use an online training app, we recommend TrainingPeaks. We are paying clients of TrainingPeaks and we use it extensively.
No matter what method you use to record, it will also make sense to lay out your plan using this same method. You can skip this by purchasing a training plan created by experts. The best results possible are always attained by bringing in the expertise of a coach. Be advised that no training plan is perfect and all training plans need to be flexible. Life happens and you need to be able to adjust the plan as needed. No matter what, do not become a slave to your training plan. That is the shortest route to disaster. There is no way to know, when you write the plan, how you will be feeling 4 weeks from now on a particular day. The training plan is merely a suggestion.
Nutrition for mountaineering
Food is your fuel and food on a mountain is fuel you must carry with you and add to the engine while moving up and down the mountain. It’s imperative that you learn how to eat properly during a climb. Keep in mind that you’ll be eating at odd times, often in the middle of the night, and while you’re moving or on very short breaks. Many fit climbers have failed to summit because they messed up their nutrition.
How to build mental strength for mountaineering
Simply put, mental strength is gained by gradually increasing the level of a specific type of stress over time. Being able to work under a tight deadline is not the same type of stress as climbing an exposed ridge. But toughness in both situations relies on confidence that you are up to the task. This means that training for mountaineering, and we have observed this hundreds if not thousands of times, leads to greater mental toughness in mountaineering scenarios.
We theorize that this is true because training is mentally tough for people. Getting out the door for a workout six days a week for months on end is a serious accomplishment. Furthermore, fitness and strength give you a raw, physical confidence. Confidence in your body that you can carefully step your way up or down an exposed section of ridge because you’re in perfect control of your body.
It is worth pointing out that too much stress can cause trauma, which is detrimental to one’s mental, and usually physical, health.
With both mental toughness and increasing physical fitness the stress, or training load, one thing is always true: It must be applied consistently and increased gradually. Equally important is periodic breaks timed to allow rest right when you’re reaching your new maximum. These three ideas: consistency, gradualness, and modulation are the three principles of all training.
Our prescription for training mental strength for climbing is therefore to follow a properly structured physical training plan for a minimum of several months.
Like many mindful pursuits—climbing mountains is at its most simple level, the sum of your daily choices and daily practices, this includes the decision to include movement and fitness. Progress is entirely personal. The spirit of climbing does not lie in outcomes—lists, times, numbers of conquests. You do keep track of those; you will always know which mountains you have climbed, which you have not. We climb knowing that what and where we can do is a manifestation of the current, temporary, state of our whole self. Ascent is an expression of many skills developed, refined, mastered.
The importance of technical skills
We would be remiss if we did not mention technical climbing skill. By technical skills we are referring to the competency and efficiency you have on any given terrain type. Most mountaineering requires a fairly basic set of climbing skills, proficiency with crampons on moderate angle ice (up to 35 degrees typically), proficiency with an ice axe used for balance and security, the ability to do basic climbing rope work. As you get into more difficult mountaineering routes you may need to be good at climbing with big boots and crampons on hard ice and bits of exposed rock.
Technical skills are important because one of the most common causes of people not having fun and not succeeding with their mountaineering projects is that they are highly in-efficient, in climbing techniques. You can be super fit, but if your technique is bad, you won’t make the summit of anything.
If this describes you, take heart. These skills are not difficult to acquire and there are many qualified guides and instructors out there to help accelerate your learning curve. If you’re new to mountaineering, it pays to take a gradual approach to learning the sport. Take a course or join a mountaineering club. Start with the objective of learning how to use your tools before you start to consider climbing to the summit of anything. A good rule of thumb is that for every summit you should have an absolute minimum of five days of practice with gear and terrain like what you’ll encounter climb. (pull quote) Don’t be the person that signs up to climb Everest having never worn crampons.
Training Summary
If we had to condense this into the fewest possible words it would be:
- Start with an aerobic self-assessment to determine the proper heart rate training zones for you.
- Engage in four days a week of zone 1 and zone 2 training efforts, the longest duration workout should make up 50% of the total weekly aerobic training volume.
- Twice a week do a good core routine such as Scott’s Killer Core Routine plus a lower-body focused, progressive, Strength Training routine
- Re-test and re-set your training zones approximately every eight weeks.
Conclusion
Training is not only the most important vehicle for preparation for the mountains it is also the one that is most with in your control. In the mountain there are many things outside of your control that can affect your success. So take control of what you can and maximize your chances for success. Constant practice begets examination and refinement of technique as well as fitness. It is not our natural tendency to value struggle over success, a valuable worldview that climbing sternly enforces. Embracing struggle for its own sake is an important step on your path as a mountaineer. Incremental vacillations in your self—your physical and mental selves—are exquisitely revealed in practicing ascent. There is no end to your progress or your process. For the two of us the pursuit of climbing mountains has been among the most powerful personal experiences we have known. Nothing else has come close to the blunt power of climbing to inform us about ourselves.
We have climbed and coached climbing at the highest levels of the sport and we know that structured, progressive training is the single least utilized—and single most powerful—tool available to every mountaineer. But not only because it will help you climb harder and faster—though it will. Training prepares your body and, most important, your mind for ascent through consistent, hard, disciplined practice.
Go simply, train smart, climb well.