
Why Blood Lactate Testing
While the Gas Exchange Test is the gold standard for determining your metabolic response to exercise, a simpler and cheaper alternative exists. Blood lactate testing has been a standby for coaches and athletes ever since portable lactate analyzers hit the market. These handheld devices are roughly the size of a blood glucose meter for diabetics and work on similar principles. A tiny, nearly painless blood sample is collected on a test strip, inserted into the meter, and a result appears in 10 to 60 seconds.
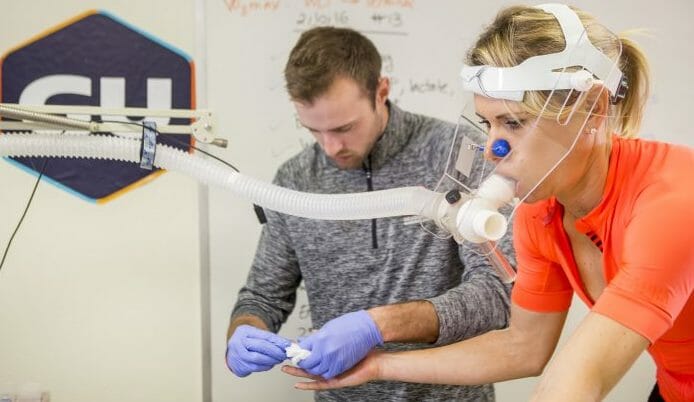
By gradually increasing exercise intensity and recording heart rate at each blood sample, you can build a lactate-versus-heart-rate graph. Since lactate is a product of glycolytic metabolism and the rate of glycolysis increases with exercise intensity, lactate concentration serves as a proxy for how much of your energy is coming from the anaerobic versus aerobic pathway.
The key number you are looking for is the heart rate at which blood lactate reaches 2 millimoles per liter (2 mMol/L). This corresponds to your Aerobic Threshold (AeT)—the upper limit for aerobic base training and the ceiling of your Zone 2. Some literature suggests a concentration as high as 2.5 mMol/L, and an alternative method defines AeT as the point where lactate rises 1 mMol/L above the lowest reading obtained during warm-up. Whichever convention you use, be consistent across all your tests.
Knowing where your Aerobic Threshold sits is the cornerstone of structuring effective endurance training. Without it, you are guessing at your intensity zones, and most athletes guess wrong—training too hard on easy days and too easy on hard days.
Understanding Lactate
Lactate has a reputation as a waste product. It is not. Lactate is recycled by the body as fuel during aerobic exercise. At intensities below your Aerobic Threshold, the lactate produced by working muscles is reabsorbed and converted back into usable energy by the aerobic processes in your slow-twitch muscle fibers. Your aerobic system acts like a vacuum cleaner, sucking up lactate and using it for fuel.
Lactate production only becomes a problem when you exceed your aerobic capacity. Above AeT, the rate of lactate production begins to outpace the rate at which your aerobic system can clear it. Lactate and associated hydrogen ions accumulate in the blood, and eventually your body forces you to slow down.
This is why the Aerobic Threshold is so important. It represents the highest intensity at which production and clearance are in balance. Below it, you can work essentially indefinitely. Above it, you are on a clock.
Through proper training, you can shift this balance point dramatically. Unlike some performance markers that are largely genetic, your Aerobic Threshold is highly trainable. High-volume, low-intensity training builds the capillary density, mitochondrial mass, and enzymatic capacity in slow-twitch fibers that allow them to clear lactate faster. The result: your AeT moves to a higher heart rate and a higher pace, and everything downstream—including your Anaerobic Threshold—benefits.
Choosing a Handheld Blood Lactate Meter
For about the cost of two lab treadmill tests, you can own your own meter. You will not need it often, but sharing it with other athletes who want to test every couple of months makes the investment worthwhile.
The Lactate Plus
The Lactate Plus, made by Nova Biomedical, has become the most widely used handheld testing device and is the meter we recommend.
Advantages: It uses a very small blood sample (0.7 microliters), which means you can use a smaller lancet and cause less pain. The test strips are reasonably priced compared to other meters. The read time is 13 seconds from sample to result, which is important because you will sometimes need to retest quickly.
The drawback: The small sample size makes the Lactate Plus prone to error readings. If the tiny blood droplet is contaminated by sweat or skin oil, you will get the dreaded “E” on the screen. This is frustrating mid-test but manageable with good sampling technique, which we cover in detail below.
Where to Buy
Lactate.com is currently the primary source in the US for handheld meters and test strips. They sell both the Lactate Plus and the Lactate Scout. The older Lactate Pro, which we also liked, has been discontinued and is becoming hard to find.
Getting a Good Blood Sample
This is where most people struggle. Getting reliably good samples takes practice. Do not expect your first test to produce clean data—treat it as a learning experience where you will waste a few strips. Contamination of the blood sample is the primary cause of error readings. Here is how to minimize them.
Lancet and Droplet
Use a fatter-gauge lancet. Rather than the fine 30-gauge lancet that typically comes with the meter, use a fatter gauge. You need to produce a blood droplet sitting proud on the skin that is roughly 3 millimeters (about 1/8 inch) in diameter. If you do not get a nice big droplet after about 10 seconds, poke again adjacent to the first site rather than squeezing harder—you likely missed a bigger capillary and the tiny hole is already clotting.
Set the lancet depth to maximum. Most lancet holders have a scale of 1 to 5. Dial it to 5. You need to hit a decent-sized capillary.
Do not test blood that looks thin and watery. Your sample should form a viscous droplet standing up on the skin. If it looks thin or watery, it is likely contaminated with sweat or the athlete is overly hydrated. Do not waste a strip.
Earlobe vs. Finger
If possible, use the earlobe. If you are testing someone else (not self-testing), earlobes are far easier to work with than fingers. The skin is thin and highly vascularized, producing clean samples consistently. Fingers—especially those of climbers and skiers—tend to be calloused, making it difficult to hit a good capillary. Hands also sweat more, increasing contamination risk. Have the athlete remove earrings before testing.
If using fingers, warm them first. In cold conditions, blood flow to the extremities drops significantly. Pre-warm the hands with gloves, a heating pad, or by windmilling the arms vigorously until the fingers turn red. Some people have Raynaud’s Syndrome, where finger capillaries shut down easily—earlobes are the only practical option for these athletes.
The Sampling Sequence
1. Clean the site with an alcohol swab before you poke.
2. Poke and squeeze out the first droplet. Wipe it away with a paper towel. This removes any residual alcohol, oil, or sweat.
3. Squeeze out a second droplet of approximately 1/8 inch diameter. This is the one you test.
4. Approach the droplet with the test strip perpendicular to the skin. Touch only the top of the droplet. If you touch the skin with the strip on a Lactate Plus, discard the strip and start over—you will get an error code. When the strip contacts the blood, it will wick up and the meter will beep. That is what you want.
5. Stabilize your hands. The athlete may be shaky from exercise. For finger pokes, use the little finger of the hand holding the meter to brace against the athlete’s hand. For earlobe pokes, brace your forearm against the athlete’s shoulder.
Have all your gear laid out and ready before the test begins: lancet holder, meter, strips, paper towels, alcohol swabs. When testing outdoors, a car hood, tree stump, or large boulder makes a serviceable table.
The Test Protocol
The general principle is to start at a very low intensity, take blood samples at the end of each 3- to 4-minute stage, and gradually increase the workload until you have identified the Aerobic Threshold.
Setup
The easiest place to do this test is on a treadmill, but repetitive laps on a moderate hill outdoors work well too. Whichever you choose, use a gradient similar to your typical training terrain. You may want to test on both flat and steep terrain to see where you are more aerobically efficient.
Pre-test fueling: You do not need to be fasted, but avoid food within 60 minutes of the test and caffeine within 4 hours. Follow the same protocol each time you retest.
Take a resting lactate sample before starting. Elevated resting lactate above 2 to 2.5 mMol/L indicates increased glycolytic activity at rest—possibly from a recent meal or possibly from very poor fat metabolism. Either way, it is useful information.
The Warm-Up
This is critical and should not be rushed. Warm up for 15 to 20 minutes at very light to light effort (3 to 5 on an RPE scale). The aerobic system is slow to ramp up, and you need it fully engaged before you start collecting meaningful data. The athlete should be slightly flushed and lightly sweating, indicating that both the skin capillaries and the large locomotive muscles are warmed up.
Take a few samples during the warm-up, especially if the resting lactate was high. Normally, as the aerobic metabolism engages, blood lactate will drop at the lower intensities. If you see lactate go from 2.0 at rest to 1.7, then 1.5, then 1.3, and then begin to rise again, the aerobic system is responding to energy demands—that dip is a good sign. If lactate climbs steadily from rest (2.0 to 2.3 to 2.7 to 3.2) through the warm-up with no dip, you are likely looking at an aerobically deficient athlete.
The Stages
Starting intensity: Pick a lower heart rate than you think necessary. You want to creep up on the AeT from below. Overshooting means you will miss it. For a first-time test, even walking pace is fine. An athlete with aerobic deficiency will have a surprisingly—sometimes shockingly—low AeT: low heart rate, low perceived effort, low speed.
Stage duration: Minimum 3 minutes, and 4 to 5 minutes is fine. The aerobic system needs time to stabilize at each new intensity before the sample tells you anything accurate.
Stage increments: Each new stage should increase heart rate by no more than 7 to 10 beats. This may cost more test strips but gives you more data points and prevents overshooting.
Intensity control: On a treadmill, increase speed or incline gradually. Outdoors, the athlete must control their heart rate within each stage. Some athletes find this difficult and may need practice before the test produces clean data.
When to stop: If you are testing only for AeT, stop once you get readings above 3 mMol/L or when lactate has risen 1 mMol/L above the lowest reading. For a full lactate profile through Anaerobic Threshold, continue the protocol to exhaustion.
Handling Bad Samples
Bad samples will produce either an error code or a wildly implausible number. If you have been getting reasonable readings like 1.7, 2.3, 2.8 and suddenly see a 0.3 or 13.6, that reading is suspect. Do not increase the intensity. Keep the athlete at the same pace and retest immediately. The 13-second read time of the Lactate Plus makes quick retests practical.
Interpreting Your Results
Record the peak heart rate and blood lactate concentration for each stage. Plot lactate on the vertical axis and heart rate on the horizontal axis. Keep in mind that heart rate numbers vary significantly between individuals—one athlete may have a resting heart rate of 40 and a max of 170 while another with identical race performance has a resting rate of 55 and a max of 200. What matters is the shape of the curve relative to that individual’s heart rate range.
Profile 1: The Athlete with a Well-Developed Aerobic Base
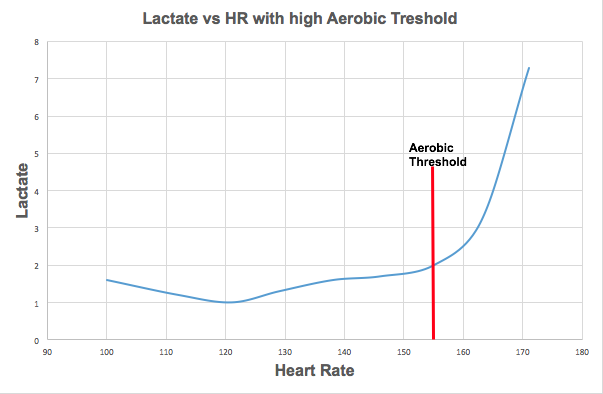
This graph shows a well-trained athlete with a high Aerobic Threshold. The initial dip in lactate at around 120 beats per minute indicates the aerobic system is actively converting lactate to fuel. As intensity increases, blood lactate rises gently toward the Aerobic Threshold. The gradual slope tells you the aerobic infrastructure—mitochondrial density, capillary network, oxygen uptake capacity—is well developed. This athlete can sustain higher intensities for longer before lactate production overwhelms clearance.
Profile 2: The Aerobically Deficient Athlete
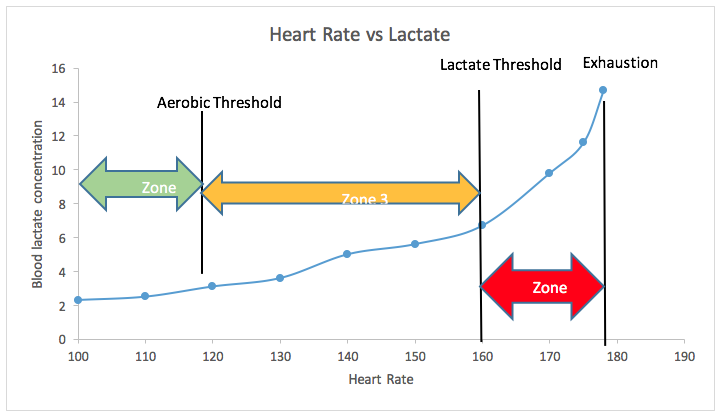
This is the pattern we see most often. Lactate starts just above 2 mMol/L and climbs steadily from the beginning with no initial dip—the aerobic system is not working effectively. This athlete surpasses 3 mMol/L at a heart rate of only 118, giving us an AeT of approximately 118 beats per minute. That is a very low AeT, indicating significant aerobic deficiency.
Notice the slight plateauing of lactate between 140 and 150 beats per minute. This likely indicates where the athlete has been doing the bulk of their training—they have developed a localized efficiency at that intensity but have neglected the aerobic base below it. The lactate curve steepens dramatically at 160, which corresponds to the Anaerobic Threshold.
Based on these results, this athlete should do all of their aerobic training at 115 to 118 beats per minute for several months to build their aerobic capacity.
Profile 2 Retested: After Six Months of Aerobic Base Training
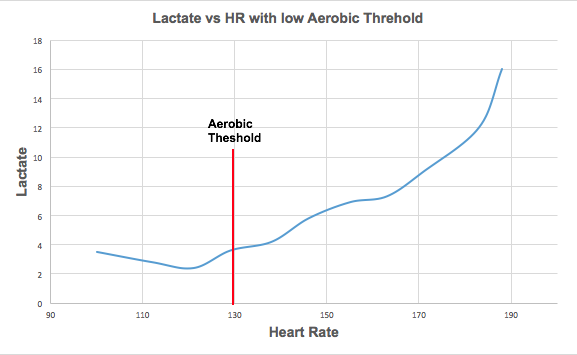
This is the same athlete retested after six months of focused aerobic base training. The transformation is dramatic. The classic dip in lactate is now visible during the early stages—the aerobic system is using lactate for fuel faster than it is being produced. The Aerobic Threshold has moved from 118 to 150 beats per minute. That is a 30-beat improvement from high-volume, low-intensity training alone.
Note the flatness of the curve around 120 beats per minute—this is where the athlete spent most of their training time. The Anaerobic Threshold nudged up a few beats to 165, which is an understandably small gain given that no high-intensity training was done. Zone 4 has not changed at all, again because no high-intensity work was included.
Now that the aerobic deficiency has been corrected, this athlete can begin adding a small volume of high-intensity training to push their AnT higher while continuing high-volume, low-intensity work to keep AeT moving upward. This aerobic base building can continue for years, training cycle after training cycle, with each cycle producing still higher AeT speeds.
Profile 3: Extreme Aerobic Deficiency
In the most extreme cases, you will see lactate starting well above 2 mMol/L at rest and climbing steadily from the first stage. There is no dip, no plateau, just a relentless upward slope. This pattern is typical of athletes who have been doing high-intensity interval training multiple times per week—CrossFit, P90X, Orangetheory, or similar circuit-training programs—while doing no Zone 1 or Zone 2 base training.
For these athletes, the blood lactate graph is a picture of an aerobic system that has been almost entirely sidelined. Even at a walking pace, some of these athletes produce heart rates of 110 to 120 with lactates above 10 mMol/L. It sounds extreme, but it is what happens when you focus exclusively on the anaerobic pathway for months or years.
The prescription is unambiguous: stop all high-intensity training and focus entirely on aerobic development at as low a heart rate as needed to sustain effort for an hour or more. It will take months of consistent work to rebuild what has been deactivated.
A Note on Using Lactate to Test Anaerobic Threshold
Blood lactate testing is excellent for determining Aerobic Threshold. For Anaerobic Threshold, we are less enthusiastic. The standard approach is to look for an inflection point where lactate begins to rise very rapidly, which in theory corresponds to AnT. However, there are practical issues:
The inflection point can be difficult to identify cleanly in your data. The intensity stages are relatively short, so the metabolic effects you are measuring are transient. And collecting good blood samples from an athlete who is near exhaustion—breathing hard, sweating heavily, hands shaking—is significantly harder than sampling during the low-intensity stages used for AeT.
For Anaerobic Threshold, we prefer a field test: a time trial at the highest effort the athlete can sustain for 30 to 60 minutes. The average heart rate during this test is, by definition, the maximum sustainable effort and sets the top of Zone 3. If you do use blood lactate to estimate AnT, we recommend confirming the result with a field test. Our complete DIY Anaerobic Threshold field test protocol is described in our assessment guide.
The Bottom Line
Blood lactate testing is the most accessible hands-on assessment tool available to endurance athletes and coaches. It is not as comprehensive as a full Metabolic Efficiency Test in a lab, but it is cheaper, more practical for repeat testing, and more than accurate enough to identify your Aerobic Threshold and diagnose Aerobic Deficiency Syndrome.
The learning curve is real. Getting clean samples takes practice, and your first test will likely involve some wasted strips and frustrating error readings. Do not let that deter you. By the second or third test, you will have the technique dialed, and the data you get will be among the most actionable training information available to you.
Test at the start of a training block to establish your baseline. Retest every two to three months to track improvement. And when your AeT has moved 20 or 30 beats higher than where it started, you will have your own graph proving that the work is working.