Why Core Training After Pregnancy Demands a Different Approach
Core training after pregnancy demands patience and a back-to-the-fundamentals approach. Growing a baby changes your structure in major, long-lasting ways. Given those shifts to your alignment and anatomy, one of the best things you can do to support your return to athletic activity postpartum is to strengthen your core globally.
Core training after pregnancy—and core training in general—is not about doing a million crunches to cultivate a six-pack. The goal is a functional core: a core that supports you as you eventually layer on more strenuous strength work and learn to move again with good postural and pelvic control.
While this article is specifically geared toward women who have recently had a baby, the concepts and exercises are relevant for anyone. Perhaps you are new to a sport or strength training. Maybe you are struggling to get past recurring, chronic, or migrating injuries. It could be that you are returning to training after a hiatus of several months. No matter your background, it is important to understand how the core functions and not to overlook it. A healthy core is vital to athletic performance.
Understanding the Core: What It Actually Is
To understand the core, you need to understand the anatomy of the abdomen and pelvis and how these relate not only to movement but also to standing and good posture. The core is not one muscle. It is a system of muscles that work together to create stability from the ribcage to the pelvis.
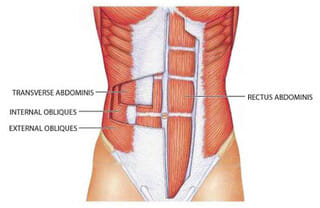
The Rectus Abdominis and Obliques
Working from the most superficial muscle to the deepest, we start with the rectus abdominis (RA), better known as the six-pack. This muscle attaches at the sternum and the pubis. Because of its length, it is divided into segments by connective tissue, giving it that washboard look.
There are many exercises we are all familiar with—sit-ups, crunches, and the like—that strengthen the RA. While a strong RA looks good, it does little to support your spine or pelvis. It can even lead to injury if the deeper muscles, primarily the transversus abdominis, are not engaging.
Deeper than the RA are two layers of obliques that attach to the lower ribs and the top of the pelvis. As the name implies, one layer runs one direction and the other layer runs the opposite way. This oblique fiber direction means that when one side contracts, your ribcage draws toward the opposite hip. When both sides contract, they provide support for torsional forces.
The Transversus Abdominis
The deepest abdominal muscle is the transversus abdominis (TA). Attaching along the ribcage, the lumbar fascia (connective tissue in the back), and the rim of the ilia (front hip bone), it creates a supportive jacket around the spine. While the obliques and RA play a role in stabilizing the core, the TA is the most relevant muscle postpartum.
The Diaphragm
Just as important as the TA is the diaphragm, which separates the thoracic and abdominal cavities. It has tendinous junctions along the lower six ribs and the back of the xiphoid (the bottom part of the sternum), as well as part of the lumbar spine’s connective tissue. The TA, quadratus lumborum, and psoas muscles all fascially connect to the diaphragm, making it crucial for lumbar stability.
Functionally, the diaphragm is your primary muscle for respiration. When you inhale, it contracts and flattens, creating space for the lungs to expand. During exhalation, it relaxes and returns to its dome shape, expelling air. Ideally, the diaphragm also syncs with the pelvic floor muscles to provide stability to the pelvis, especially during movement.

How Pregnancy Changes the Core
Pregnancy and the culmination of labor and birth is a doozy for the body. As the baby develops, there is less space for the diaphragm to expand, the ribcage often tilts to create space in the abdomen, and the back muscles respond by shortening. Your pelvic ligaments soften to prepare for childbirth, and your abdominal muscles stretch and shift to accommodate the growing baby. Taken together, these changes lessen your overall thoracic and pelvic stability.
Then the delivery itself—either vaginally or by Caesarian—takes a significant toll on your pelvic floor and core muscles. It is no wonder that it can take months or even years to feel back to normal after giving birth.
The nature of creating space for a growing baby usually results in a shortening of the back muscles, creating more curve in the low back by tilting the ribcage backward and the hips forward. As pregnancy progresses, this becomes more pronounced. The growing baby also pushes into the diaphragm, making breathing more difficult and causing the core to become disconnected from its normal breathing-based stabilization mechanism. Since this postural shift happens gradually over ten or more months, many women do not even notice how much their alignment has changed.
Once you feel ready to bring your core back online, start gradually. The exercises below will help you develop good postural habits and rebuild deeper core control.
Finding Neutral: Posture Before Exercises
In order to engage the correct muscles, you must first find and maintain good posture. This is just as important as the exercises themselves. Your spine, pelvis, and ribcage are all positioned in relation to each other. If your pelvis tends to tip forward, your spine will curve, and your ribcage will tip backward to balance you out. We all have postural habits and movement patterns that develop over our entire lifetimes, so do not be discouraged if holding the following positions is challenging.
“Neutral” means that if the pelvis is a bowl full of water, the water does not spill out the front or from either side. The ribcage is like an upside-down bowl, so the same applies: the front ribs should ideally be in line with your pelvis, not flaring out. This eases the muscles of the low back and allows the spine to also be in a neutral position. This is your starting point for each exercise and, really, should guide how you position yourself throughout the day.


Start by standing with a mirror to your side. Look at how your ribcage relates to your pelvis. Check that your knees are not locked and that your pelvis is in a neutral position. Imagine headlights on your front hip bones: where are the lights pointing? Once you can find your supported posture, you are ready to begin the exercises.
The Bread Loaf Test: How to Know If You Are Overloading
Before starting the exercises, you need to understand one critical concept that will guide every core workout you do from here forward.
When the TA is either overloaded (the exercise is too hard) or disengaged, the RA comes in to compensate. When this happens, the muscle belly of the RA pops up, creating what looks like a bread loaf sitting on top of your stomach. This is an instant indicator that your spine is not being protected by the deeper core muscles.

For these and any core exercises: if your stomach turns into a bread loaf, stop. Reengage your TA, and either reduce the range of motion or shorten the lever you are moving. The bread loaf is your built-in quality control. Respect it.
The Beginning Postpartum Core Exercise Progression
The goal of this progression is to get your diaphragm, TA, and pelvic floor muscles working together again. Because these exercises target neuromuscular reconnection rather than muscular fatigue, you can do them multiple times per week. They should not make you sore so much as more connected to muscles you may have forgotten about.
As with any well-structured and progressive training, do not compare what you can do with what you see others doing. Start from where you are and progress from there.
Exercise 1: Breathing
The first exercise is to connect your breath to your pelvic floor and TA. Lie on your back with your knees up and feet on the floor. This position is called hook lying.
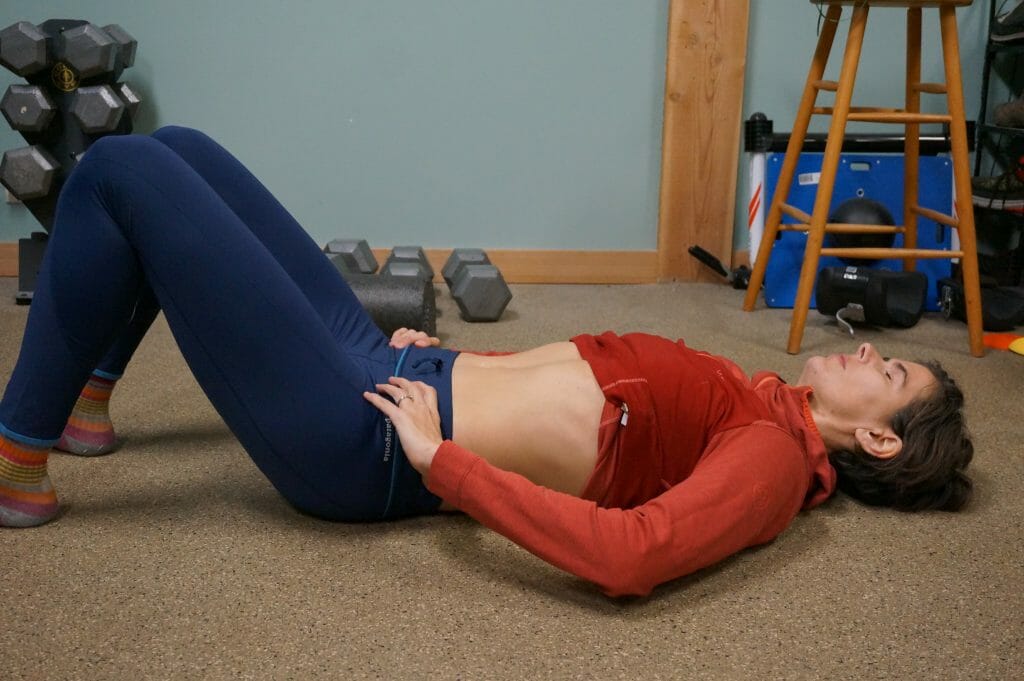
Check your ribcage and pelvis to see that your back is not arching and your pelvis is not tipping forward or backward. Place your hands on each side of the top of your pelvis, on the ilia, and start paying attention to your breath.
As you exhale, draw up your pelvic floor muscles (as if you are stopping the flow of urine), which will automatically engage your TA. You should feel this engagement under your hands, as if your hip bones are drawing closer to each other, or you are zipping up a tight jacket. We are looking for muscular control here, not clenching. As you inhale, relax your deeper muscles while still maintaining proper structural alignment.
Do 10 breaths.
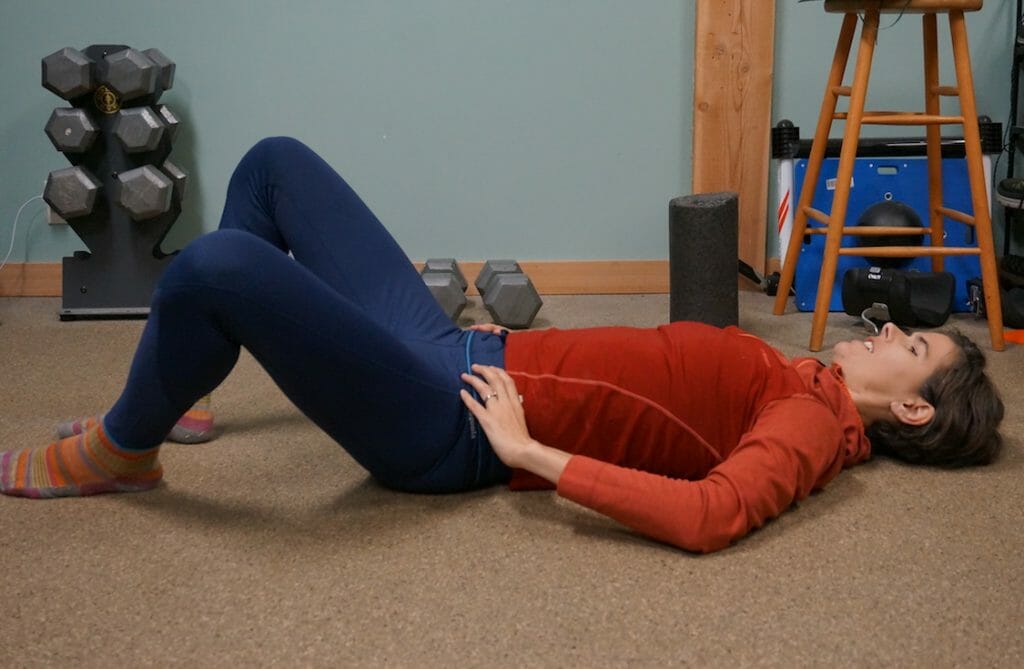
Exercise 2: Hip Bridging
Start in the same hook lying position and take a breath or two to ensure good core engagement. As you exhale, keep your pelvis stable while raising your hips. Hold at the top for one full breath cycle and then slowly lower to the floor.

This exercise reveals your postural patterns. If you reach a point where you either lose your core engagement or your ribcage flares out, readjust to engage the core, or lower back down and try again. If you have trouble feeling your core, place a yoga block or foam roller between your knees and squeeze your knees together as you lift. You should feel your glutes working; if your hamstrings cramp, squeeze your glutes more.
Do 10 reps with a full breath at the top.
Exercise 3: Bent Knee Fallout
The next step is to maintain the same connection with your breath while introducing gentle limb movement. Start in hook lying and connect your breath to your core. On an inhale, once you feel good core and pelvic engagement, drop one bent knee out laterally toward the floor.
Only go as far as you can while still engaging your core. This might only be one inch, which is fine. Over time you will be able to achieve a larger range of motion. Exhale to bring your knee back, then switch legs.
Do 10 on each side, alternating.
Exercise 4: Marching
Begin in the same hook lying position. When you feel good core and pelvic engagement, bring one knee up, lifting the heel from the floor. As you inhale, lower the leg back down. On the next exhale, lift the other knee.
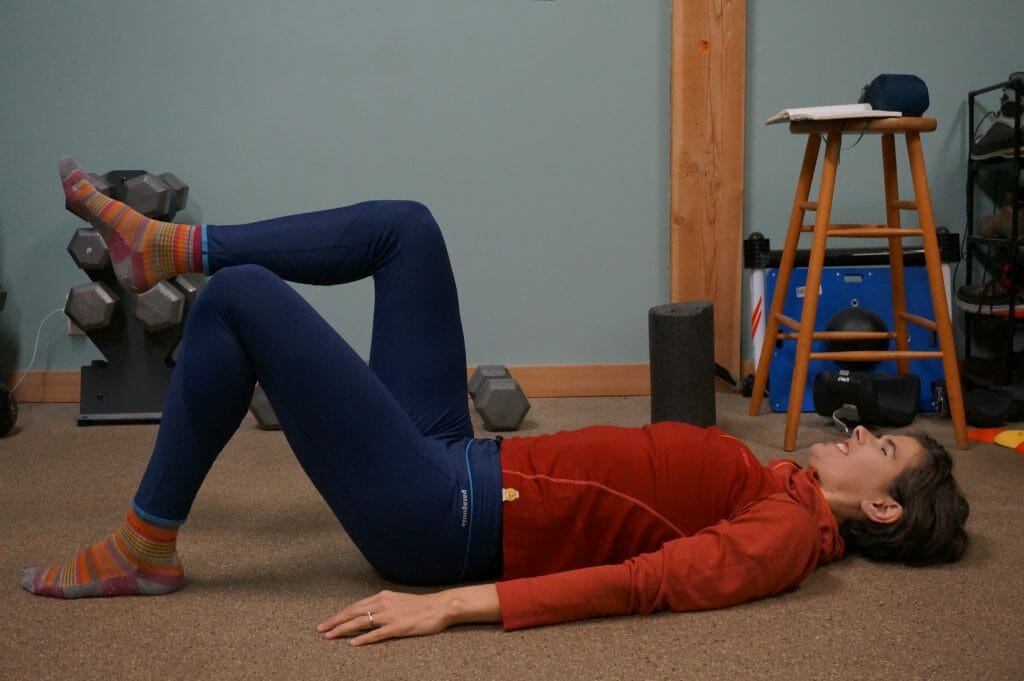
Like the previous exercise, only do as much range of motion as you can while maintaining core connection and pelvic stability. If you lose the core, you will feel your pelvis shift side to side.
Do 10 on each side, alternating.
Next Steps
These exercises might not feel like much. That is by design. The goal is to rebuild the correct foundational support for proper function. You recently had a baby. Focusing on your core now will allow you to return to harder, more sport-specific strength and movement safely, without putting your body at risk of injury.
Continue doing these daily or every other day until you can complete them easily, with no bread loaf, and with consistent engagement throughout. In addition, practice finding neutral posture in other positions throughout the day—standing, sitting, walking. The more often you find neutral, the more automatic it becomes.
When these exercises feel easy and controlled, you are ready to progress to more challenging core work and to begin layering strength training back into your program. A subsequent article will cover that progression.
DISCLAIMER
This article is for general information and not medical advice. It is important to discuss your return to activity with your doctor. Every woman and pregnancy is unique and should be respected as such. If you have a more serious condition like diastasis recti, we highly recommend working with a physical therapist who specializes in women’s health and postpartum wellness.
Further Reading
“Patterns within the abdominal muscle wall in postnatal women”
The Female Pelvis Anatomy and Exercises, by Blandine Calais-Germain
Anatomy of Breathing, by Blandine Calais-Germain