Our General Strength Training Routine for Mountaineers and Climbers relies on simple to learn, mostly body-weight exercises. The exercise list alternates between upper and lower body movements and is set up to do as a circuit. The need for minimal props means that this routine is highly portable and can be completed almost anywhere.
For an in-depth explanation of the role strength training plays for mountain athletes we recommend Strength Training for the Mountain Athlete.
Start with Core as your warm-up.
Postpartum? Start here.
Here is easier our Core Routine Video
The more difficult Scott’s Killer Core Routine
General Strength Routine Exercise List
Turkish Get-Up
Push-up
Split Bench Squat
Dips
Box Step-up
Pull-ups
Squat
Hanging Leg Raise
Here is our general strength routine as a free printable PDF
The How-to
If you are new to training, start with one time through this circuit with light weights. If you are an experienced with strength training you probably need to start with two times through the circuit.
Every two weeks add another lap through the circuit. Working up to four circuits in the eighth week.
Move from one exercise immediately to the next. Take a three minute break between circuit laps but try to move from one exercise to another within thirty seconds.
Add more challenge whenever you can do more than ten repetitions of any one exercise. Repeat the same or slightly varied routine twice a week and feel free to create your own variations on the exercises. With this variety of exercises and with many of them being body weight, we have specified a recommended number of repetitions for each exercise rather than a more typical blanket prescription of four sets of ten to twelve reps.
Do not push to failure. Look for details in the notes accompanying each exercise photo and description. Don’t expect it to be easy.
On the road? Don’t have a gym? Try our No-Gear Strength Workout
We recommend integrating maintenance work such as foam rolling, shoulder and rotator cuff exercises, and shoulder mobility work.
Turkish Get Up
The difficulty is mainly due to shoulder and hip flexibility along with core, not leg, strength. Using a weight that is too light (a small dumbbell) will allow you to cheat the form and lose a lot of the benefit of this exercise. Once you learn the movement and develop the hip and shoulder flexibility, you need to increase the weight. Change dumbbell hands while you are supine. When you can do five reps of each hand, then increase the weight. For advanced users, try using a long barbell.

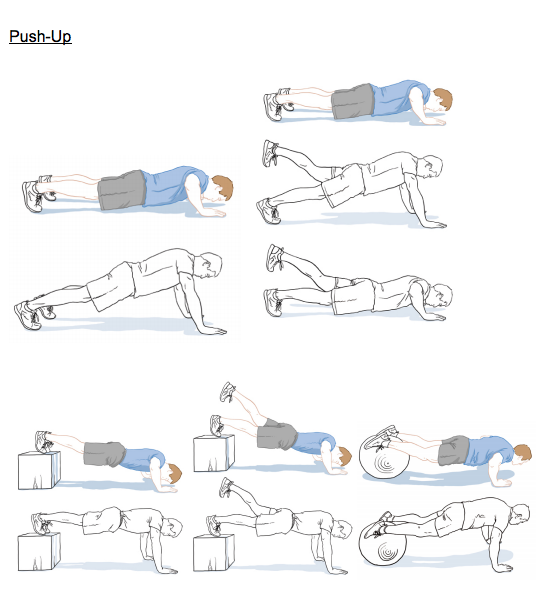
Push-Up
Great whole-body exercise that connects hands to feet. When you can execute ten reps progress to raising one foot off the ground while maintaining strict push-up form. When an elevated single foot gets easy, add a weight vest or place a box or exercise ball under your feet.
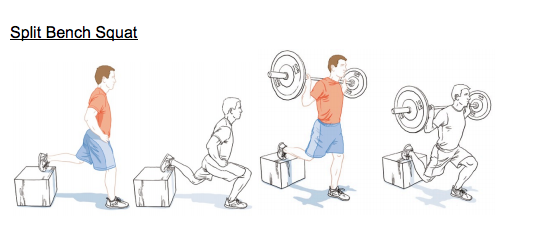
Split Bench Squat
Similar to a lunge, this works the big muscles that propel you uphill and does it on one leg at a time, which requires balance. Use a split stance with both feet on the floor and start with body weight only. Pull your hips up over the front leg, trying to use the back leg only for balance. Progress first by raising the rear leg on to a bench or even an exercise ball. Once balance is established add resistance via anything from a backpack or weight vest (easiest) to a barbell, which will be a big balance challenge. When you can do ten reps, start adding the variations to increase the challenge.
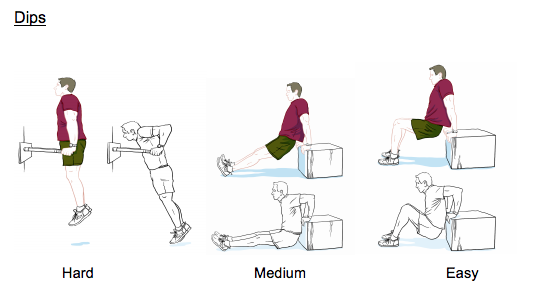
Dips
Dips are great for general shoulder health and will help with those pesky mantels. Unless you have a shoulder injury, use a full range of shoulder motion: Drop so far down that you feel a good stretch in your pectoral (chest) muscles. You may need assistance on this one but still use full range of motion. When you can do ten reps, add more resistance.
Box Step-Ups
This is another exercise that effectively targets crucial uphill propulsion muscles. Use a solid, hard topped box 75% of knee height.
Here is a video demonstrating proper technique.
The lifting of the foot onto the box is part of the exercise. Imagine punching steps up a steep snow slope. You know that feeling of stepping up two feet (0.6 meters) high and then standing up on that foot while it sinks as the snow compresses (but hopefully does not fully collapse). Now you get the feeling of what we are training here. This is mind-numbing work, but an essential strength for anyone spending serious time in the mountains. Step up and fully balance on the loaded leg before stepping back down. Repeat. When you can do ten reps increase weight. Hold two barbells, load a pack, or for a real challenge use a barbell resting on your shoulders.

Pull-Ups
This is a staple for rock and ice climbers. Mountaineers not interested in technical climbing are encouraged to do this important upper-body exercise, but it can be skipped.
Once you can do fifteen normal pull up repetitions you are ready to mix it up a bit. You can do this either by doing one of the variations we list below or progressing the strength via the method laid out in the Pull-up Max Strength section of Training for the New Alpinism (page 228).
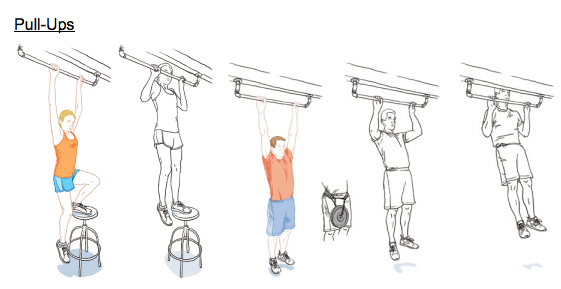
Be aware that a high volume (many dozens in a day) of normal pull-ups from a bar can increase the likelihood of elbow tendonitis since the fixed handgrip forces your elbow into a restricted range of motion. Rather than go for a high volume of unweighted pull-ups, it is much better to work through some pull-up variations. Here a few we have used over the years.
- Add weight to whatever variation you can do fifteen reps of.
- Offset Pull-ups—one hand higher than the other. The lower hand grips a towel or rope hung over the bar.
- Lock-off 90s to 120s—Pull up, hold the full lock-off for five seconds with your chin as far over the bar as possible, lower to 90 degrees, hold for five seconds, lower to 120 degrees, hold for ten seconds. Vary the exact positions so you build lock-off strength in any arm position.
- Frenchies—This is an advanced pull-up technique that combines the maximum strength gains that come from isometric holds while taxing the muscular endurance of your fast twitch fibers. It’s a great addition to the experienced climbers strength-training repertoire. Begin in the normal pull-up position with palms facing away. Pull up to the top position with chin above the bar. Hold that position for five seconds. Drop back to the bottom hanging start position and immediately pull back to the chin above bar position then immediately lower to the mid point spot where your elbows are bent 90 degrees. Hold this position for five seconds and then lower to the bottom again. Once again pull all the way to the top, but this time lower to the point where your elbows are bent 120 degrees and hold for five seconds. This completes one full repetition. Weaker climbers should then take a break and drop off the bar and rest for three to five minutes before doing another repetition. Continue with that method until you can do five full repetitions. Stronger climbers can immediately begin the next repetition with no rest. If you are unable to complete three repetitions without stopping you make faster progress by taking a three to five minute rest break and doing more repetitions.
- Typewriter—with a very wide grip, pull up on the right, traverse your chin along the bar, and lower on left. Make circles going in both directions.

- Deep pull ups using ice tools—lock off with your hand as far below your chin as you can. Really strong climbers can bring their hands down close to mid chest level.
- Towel pull ups—hang a towel over the bar and pull up while gripping each end of the towel. Let your imagination take over. The possibilities are many.

Squat Progression
The squat is known as the king of lower-body exercises but needs to be learned and executed carefully. We prefer to start with a front squat and holding a broomstick on the tops of your arms. Feet toed out a little and shoulder width. Do not let the bar roll forward. If it rolls you are leaning too far forward at the hips. Maintaining a neutral lumbar spine is essential in order to protect your back. A mirror or a knowledgeable partner will be helpful. Practice holding this neutral spine position through the full range of motion with light weight before adding any significant resistance. This engages almost the full core musculature and adds stability so your hips and legs can apply the lifting force. Many people are too stiff in their hips and legs to do this exercise properly. You can add a small lift under your heels to help tilt you forward. With time your flexibility will improve. When competent you can progress to a conventional front squat holding the barbell on the front of your shoulders with either of the grips shown below.
In all forms progress to ten reps before adding more weight. The back squat is the common form and allows the heaviest weight to be lifted, but we recommend mastering the above methods before progression to heavy back squats.

Hanging Leg Raise
Can be done with either straight arms or bent (as in a lock-off position). The main thing to remember is, do not swing! You may need to start with bent knees and pull them to your chest before slowly lowering them. You may only be able to do one to two reps at first. This is a dramatic test of core strength. Work toward a straight leg raise and lower under complete control. Taking your shoes off for this will really help to start out. When you can do ten good reps with straight legs, add weight to your feet in the form of shoes and later boots.