Many climbers write off the Figure 4 as an advanced ice climbing move reserved for the most advanced mixed climbers. Take the the Figure 4 into the gym, however, and it becomes a great core exercise that addresses the entire upper body—hip flexors, abdominals, lats, shoulder girdle, and grip—in a very ice-climbing-specific way. It is also advantageous to learn this movement in the safety of the gym, so if and when you do need to try a Figure 4 outdoors, you know how.
The Three Figure 4 Positions
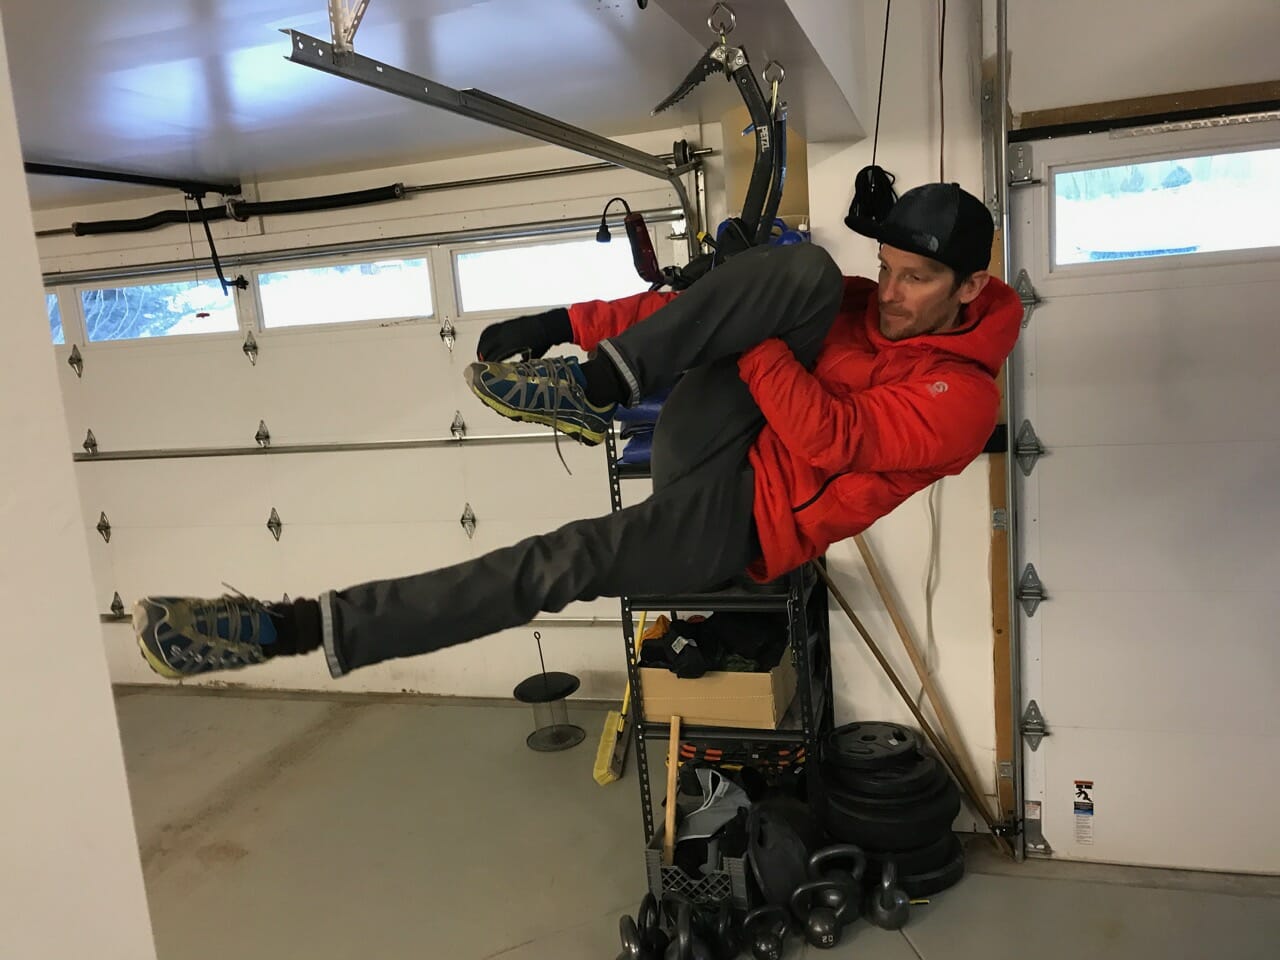
First a few tips on the move. Many people do not realize that there are three Figure 4 positions: low, middle, and high. The low Figure 4 is the most frequently used position, but it is quite difficult to move out from. If you lack the strength, you may get stuck in the low Figure 4. In our experience the best position is the middle Figure 4. It is easier to move from than a low Figure 4 and you can use your leg to squeeze your forearm tightly, which adds to your stability and the strength of the position. The high Figure 4 is often needed for the most difficult drytooling moves. This position gives you the most reach, but you can’t squeeze the forearm of your gripping hand very hard compared with the middle Figure 4. It also requires more strength to extend.
One often-overlooked advantage of a Figure 4 is that when you’re climbing on insecure holds, weighting the tool in this way keeps the force straight down, and therefore more secure. Many of us, especially us old-schoolers, are tempted to first try to climb with our feet. But even a slight amount of foot pressure can put an outward force on the tool, which can be enough to cause it to pop, and you to fall.
Training Figure 4s in the Gym
Our goal is to teach you how to do a Figure 4, and hopefully add a fun new twist to your ice climbing training. You will need a place to hang from two tools, ideally where you can fully extend your arms without your toes touching the ground. Place a bouldering pad or other padding under the area in case you fall.
Remember: In a Figure 4 move, the opposite leg goes over the opposite arm. In other words, your right leg goes over your left arm and your left leg over your right arm.
Start by engaging your shoulders and core. Curl your legs up as you rotate your body up and back. Bring your leg over the arm to rest it in the elbow (low position). If you can’t execute this move, keep working those hanging leg raises. Here’s a video to be sure we’re all clear on how this move works.
And finally, one bit of practical advice on the Figure 9, which some of you might have seen. It is similar, but with the right hand over the right foot or the left hand over the left foot. The Figure 9 move is not a replacement for the Figure 4. It is used for going sideways across a roof, away from the arm/leg side that is engaged, or for grabbing a rest before a big move. Because it’s not significantly different from a Figure 4, we don’t see an advantage to training Figure 9s in the gym.
The Core Figure 4 Exercise
Hang from two tools and move into and out of a Figure 4.
Right side:
- 3x to a high Figure 4 position (pause with your leg gripping wrist area lightly)
- 3x to the middle Figure 4 (pause with your leg tightly gripping forearm)
- 3x to the low Figure 4 (pause with your leg in the crook of the elbow)
Rest 2–3 minutes, then repeat for the left side.
You can make these more difficult by:
- Doing them weighted (ankle weights or boots)
- Holding your legs out straight, approaching a front-lever position.
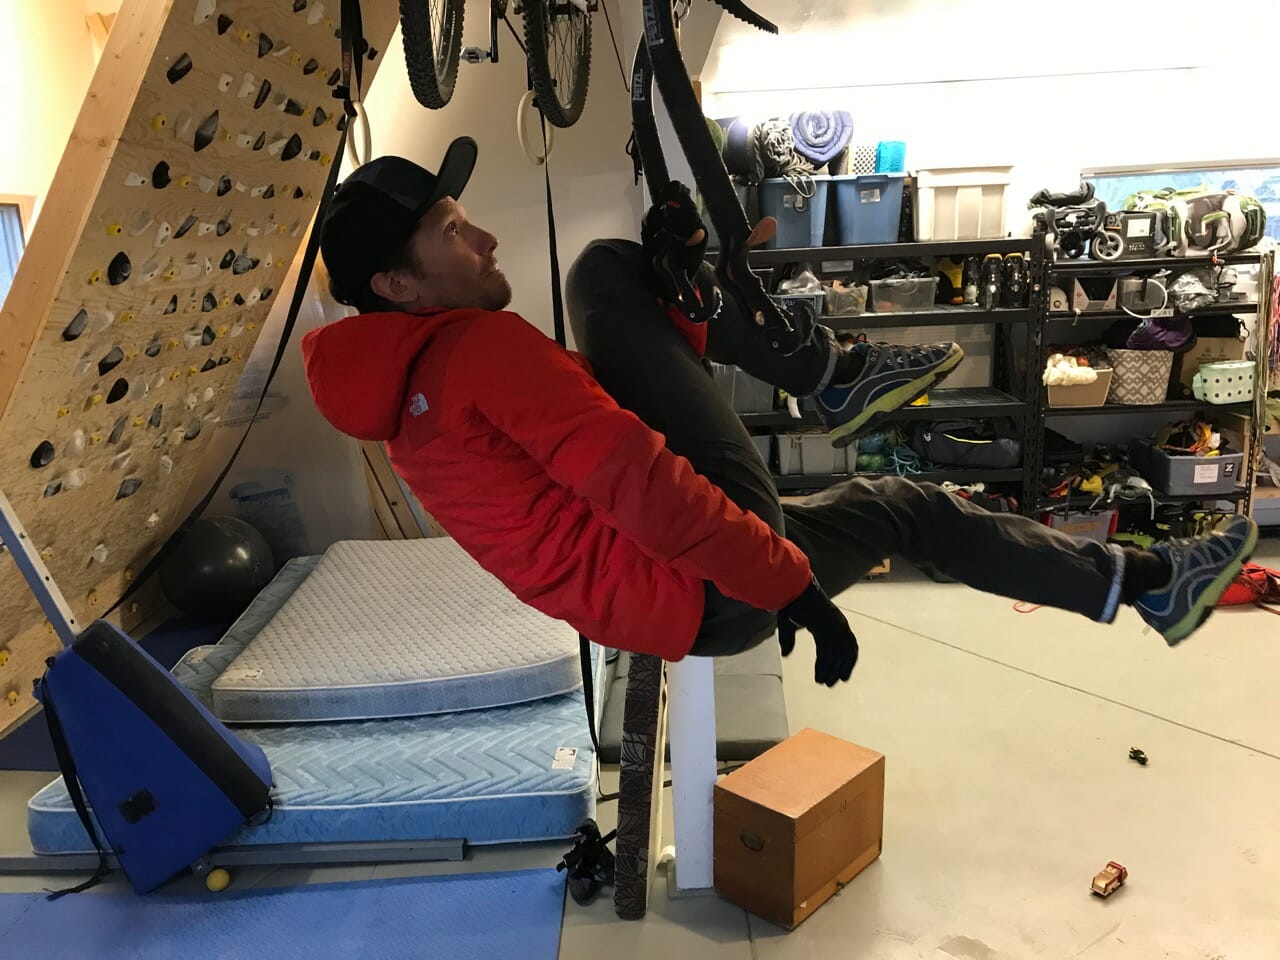
Figure 4 Reaches
For the more advanced climbers who may be applying this movement on a route:
10x per side, 2–3 minutes rest in between.
Get into either an open or closed (you need to practice both, so go back and forth) middle or high Figure 4 position and drop your free hand down. From that starting position, twist and reach your hand as high and as far up and forward as possible—as if you’re reaching for a hold. Progress by gripping a dumbbell (it won’t take much). It is best to do this with a nearby wall so that you can practice pushing with the straight leg. This comes closest to simulating the most common form of this movement, and often the crux of a real route.

Good Figure 4 Form in Action
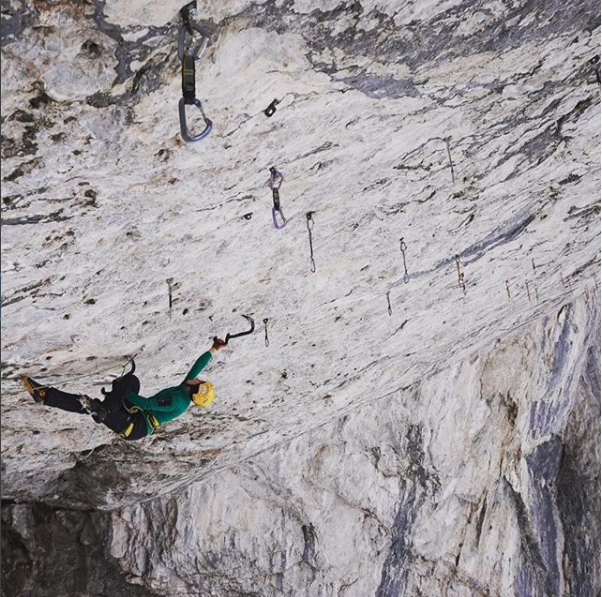
Now that you know something about this technique, it’s easier to appreciate Angelika Rainer’s excellent form in the above photo. Her Figure 4 is very high, and she has her foot in front of her thigh, probably to get the right angle on the reach. It also looks like she’s gripping the topmost grip on the tool. Her trailing leg is fully extended and she’s toeing hard into that foothold, which surely helps her maintain the body tension needed to straighten her torso and extend her arm to reach to that hold. It should come as no surprise that Angelika is a three-time world champion in mixed climbing.
-by Steve House and Andres Marin